The armored vehicle rumbled through the streets, stirring up a cloud of dust as it went along. Standing in the open upper crew hatches, soldiers scanned every rooftop, every watching eye, weapons ready. Inside the troop compartment, the rest of the squad sat quietly, rocking back and forth as bumps and potholes were traversed. Dust filtered in from the open hatch, giving an ethereal feel to the light that streamed in.
The heat was almost unbearable, causing beads of sweat to pour down each face. The dust was washed away as the perspiration flowed, leaving each face streaked, almost scarred looking.
While everyone seemed to be almost asleep, all ears were tuned for the sounds that would bring instant action. Despite the armor all around, everyone knew that it was essentially an iron coffin, with little hope of escape should an anti armor rocket slam into the slab sides of the metal beast.
The vehicle slowly ground to a stop, the gunners up top tensing as they waited for action. The squad leader reached over and opened the rear door. “We’re here” was all he said, climbing out.
I looked at my buddy sitting next to me, our eyes locking for a moment. “You ready for this?”, he asked.
“No, but I guess that don’t matter.”
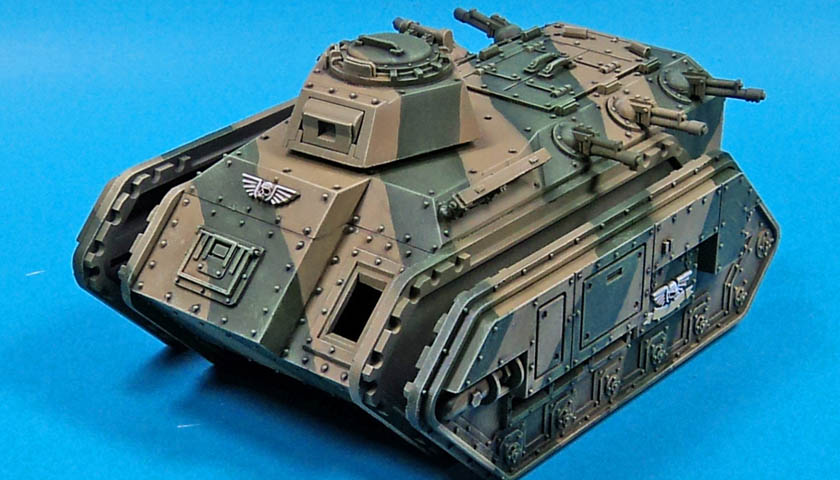
It’s funny what modeling will bring to mind, even scifi modeling like this Warhammer 40K Imperial Guards Chimera. As I began building this kit up, I couldn’t help but notice the resemblance to the M113 armored personnel carrier. The boxy shape, especially the rear troop loading door, really struck a chord.
As I painted and assembled the crew interior, I drifted a bit, remembering another place and another time. You see, that short dramatization was not a fictionalized account. That’s a memory from June 1993 in Mogadishu, Somalia, riding in the back of an M113 with a squad of Pakistani soldiers, heading to the day’s mission. Odd that a vehicle for a 41st century table top game can evoke such mental wanderings.
Thankfully, I can reflect on it, close the book once again, and focus on my model.
This kit is really fun. It’s only my second Citadel vehicle build from the Warhammer 40K universe, but I’m sold on them. Yeah, they can be a bit pricey. But if you look, you’ll find a reasonably priced kit here and there. They’re fun to build, and the sky’s the limit with finishes. And the only rivet counting you’ll do is while you’re applying a shade to every rivet. Every. Single. Rivet.
For the interior, I did a heavy dry brush of Citadel’s Runefang Steel, then followed with a heavy coat of Citadel Nuln Oil. Next I assembled the full vehicle, popped the turret on, and closed up the troop hatch. Happily, it held in place so I could spray right over it and didn’t need to mask it.
I decided to give the Citadel paints a try through my airbrush. I’d heard good and bad reports, but figured I might as well find out for myself.
I started by thinning Citadel’s Zandri Dust with Vallejo airbrush thinner. I went with a very thin blend to start, hoping I could mist it on. I initially mixed it a bit too thin, but after adding a little more paint, I was able to get a decent spray, though tip dry was a problem.
With the tan color in place, I had a decision- mask it for the green camo, or try it freehand? As I did want to find the limits of these paints through an airbrush, I went with the freehand method. While it wasn’t bad when viewed from even a few feet away, I was not happy with the overspray pattern. Viewed as a model, it wasn’t too egregious. But viewed in scale… it was a no go.
So grabbing my paint brush, I decided to neaten it up a bit. When all was said and done, I should have just gone with the masking, or hand painting, from the beginning. Overall, it looked OK, but I don’t know that I’ll put much time in the future into freehanding anything with Citadel paints through an airbrush. Blue tack all the way!
With the basic colors in place, I did some GW style drybrushing, using Straken Green and Ushabti Bone over their respective colors, and then a final drybrush of Screaming Skull over the whole thing. The drybrushing was followed by Nuln Oil as shade, and then a filter of AK Interactives’ Streaking Grime for DAK Vehicles. I’ll let that dry for a few days, and then I’ll proceed with the ‘eavy weathering. 😉
I like this kit. I really do. It’s odd how a fictional model can evoke such memories, even after a quarter of a century.


Leave a Reply