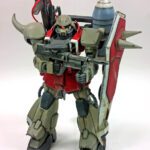
The Gunner Zaku Warrior is finished, and I am actually quite happy about how it looks. Certainly there are several areas that could have been better, but viewed as a whole, it’ll do I think.
As I’d blogged previously, I’d not been happy with the way the canon pink color was looking. Finding a color that was not too intense, but yet not too drab, was proving to be a problem. I decided to spray over my experiments, grabbed some Tamiya XF-20 Medium Gray… and liked the result. It’s really less of a “medium gray”, and more of a “medium tan”. But I think it is that very warmth to the color that allows it to work well with the dark red.
The assembly is simple enough, as the kit’s structure is closer to a High Grade kit, though the scale is 1/100. It’s even simpler than the RE/100 or IBO kits of the same scale. Still, it gives a great palette for painting expression, and if you like adding panel line detail and scratch building parts, there is loads of room for that too.
I did have to address a few seams, in the forearms, shoulder pauldron, and upper thigh armor. For the shoulder pauldron, I was able to simply glue it together, and then sand things smooth. For the arms and upper legs, I decided to paint everything first, assemble it, and then where feasible, scribe additional depth into seams that could be made into “panel lines”. Where that did not work well, or look right, I isolated the area with Tamiya masking tape, applied a few good coats of Mr. Surfacer 500, and after allowing that to fully cure, sanded it down and repainted.
So while there are some seam lines to deal with, they are not so egregious to cause much concern- especially given that the cost of this kit is generally low for a 1/100 scale Gunpla.
The red areas are painted with Vallejo Mecha Color Dark Red, while the tan areas are Tamiya XF-20, as previously mentioned. The light blue, if I recall correctly, is Ammo of Mig French Blue, though as I write this, I’m not so sure. (And I’m not home to check on it… :/ ) Various darker grays were used for the inner frame parts, weapons, feet, and knee/elbow armor. I rarely take notes of the colors I use, so quite often I’ll use one color of paint in an early part of a build, and still another color another in later sections, simply because I forgot what I’d used previously. Still, it all seems to work out in the long run.
For paint chipping, I applied the sponge method with Ammo of Mig Chipping color acrylic paint on the lighter colored parts, and the XF-20 on the darker parts. I used some Citadel Leadbelcher on the feet, though I realize now the contrast is so low, I probably should have used a lighter gray. (Oh, well… I suppose I must build another Gunpla to test that out on. 😉 )
Additional weathering was added via airbrushed stains and streaks, enamel washes, and even some “magic wash”, composed of Future floor polish, and a drop of dark red and dark grey acrylic paints. I like to use this as it avoids the “Bandai plastic bug” that liberal applications of enamels can bring. By applying washes of tinted Future, often over an already wetted surface (with water), nice streaks and flows can be achieved. It does require a bit of effort, as once it dries, it cannot be wiped off as enamels or oils can. Still, with a little experience using that method, it is a valuable tool to have handy in your bag o’ tricks.
The assembled model was given a coat of Vallejo Matte, and all the various packs and shields and guns were attached. The main feature of this Gunpla is the big honkin’ gun it carries, and while it looks cool, it sells better than it installs. You can get the gimmick to work, but because this kit is not super articulated, I didn’t find posing it to be that great. (Thus the “Olan Mills” look of some of the photos… they actually made me laugh after I looked at them.) Of course, I also like to leave most of the posing to the eventual buyer, as too much movement on any painted Gunpla results in paint scrapes. So aside from some basic poses, I defer from “play time” with these kits.
I do like the look of this model, and it was a fun kit to build. There’s nothing difficult or challenging about it- prime it, paint it, slap it together. Add weathering. Post it online to all the places. 🙂
If you like this bigger scale, but have grown a bit weary of Master Grade kits that contain all of the parts in the world, give this one a go. it’s affordable, fun, looks cool, and offer loads of opportunities for modification and color changes.


Leave a Reply