(Sorry… couldn’t help it. That was a gratuitous Rick Flair allusion there. 🙂 )
One of the reasons I’d made a decision to branch out from a decade of building aircraft was a feeling that my painting and finishing methods had gotten a bit stale. Model building had become very formulaic. They looked alright, I suppose, and people gave me back pats (all appreciated!), and told me “it looks great. It’s even better than your last one!”
Yet at some point, I thought “if it is even better than my last one, why are they all looking the same?”
I made some moves to shake up my style. I initially began to explore the “Spanish School” of aircraft finishes. And while that phrase tends to polarize many people about how it looks, I realized in trying to execute the techniques that my skill set, while generally advanced, had some serious gaps in basic fundamentals.
Eventually, this led to a “branching”, a time of exploration of Gunpla, scifi, and Warhammer 40K.
In researching the styles and techniques of the latter, I of course encountered Warhammer TV, and Duncan Rhodes. (He of the two thin coats!) What impressed me was the straightforward simplicity of the basic Games Workshop, or GW, style. It could be summed up in a few words- prime, base, shade, highlight, and detail. Now of course, each of those steps can be very simple or very involved. But what fascinated me was when stripped to just the bare basics, the results were far better than I’d have intuitively expected. And the simple reason was that of contrast.
In real life, we have loads of visual clues all around us that bring out shape and depth and light. Look around you- virtually everything you see had gradients, highlights, shadows, indications of texture (or lack thereof)… the world abounds with these basic concepts.
And while I had been applying them to my models, the thinking there was almost secondary. I don’t recall ever thinking “I need contrast here”, or “this needs highlighting”. Many aircraft modelers eschew that type of thinking, in fact. They call it contrived, quite often.
Of course, in a sense, it can be. Yet the goal is to do exactly what we see in the world around us- provide visual clues to bring out the shapes. But in the world of scale modeling, exaggeration often helps the brain form a real sense of weight and substance and depth to a small object that in and of itself is relatively flat.
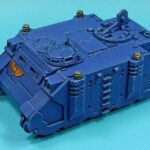
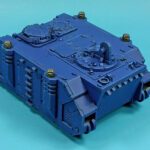
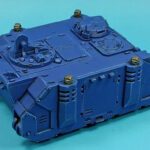
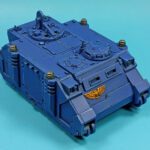
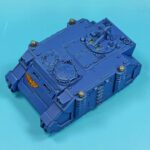
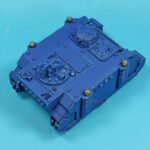
Which brings us to this Citadel Warhammer 40K Razorback.
On a previous 40K build, the Imperial Guard Chimera, I’d attempted a style that was in the GW “ethos”, using drybrushing for edge highlighting. I liked how it looked, but I did see that the use of acrylics for drybrushing so much of a model left a somewhat dusty and distressed look. Of course, for a model painted in earth tones, it worked.
However, this Razorback is a darker blue, and I wanted to see how highlighting edges in a more ‘eavy Metal style would look. (I’ve learned that “‘eavy Metal” is the style of the folks who build the models for Games Workshop’s product photos. It’s a very distinct, bright style that has a very cool appeal in my opinion.)
I decided to start with a basic “Duncan” approach. Prime, base, shade, and edge. The model was primed in Badger’s Stynylrez Gray Primer, and then I applied a base coat of Citadel’s Macragge Blue. I did apply that with the airbrush, as my brush skills are still quite deficient, especially when it comes to painting broad areas. And my focus here was not so much exploration of smooth brush painting, but rather on the later steps.
I then used a Citadel Shade, Nuln Oil, to essentially wash the recessed areas, which really helped bring out the shadows. After a touch up here and there with Macragge Blue to “neatin’ things up”, I proceeded with the edge highlighting.
I’d tried this technique before on some smaller Space Marine figures, but with limited success. While the concept seems brutally simple- paint the edges a lighter color- the execution can be a bit difficult. Shaky hands and less than perfect eyesight don’t help, either.
However, I thought that with all the edges this model had, there would be plenty of time to practice. So grabbing Citadel’s Calgar Blue, I began to “get edgy”.
Initially I started with the paint thinned at a ratio of about 2 parts paint and one part water, but I found this did not flow well. I’d thought if my paint was too thin, I’d have trouble controlling it. However, as I progressed, I found that the ratio ended up swapping- two parts water and one part paint. And that seemed to work very well.
I also tried different brushes. I’d seen in videos on Warhammer TV that the optimum way to edge highlight was place the brush at about a 45 degree angle to the edge, and using the side of the brush, not the tip. I started with a 0/2 liner, thinking the fineness of the brush would help. However, it proved a bit flimsy, and held little paint. By the end, I’d switched to a 2 round brush, and found that for most areas, especially the angle edging, it worked very well.
Some areas, such as gaps in hatches, and adjacent lines, required a smaller brush and a more delicate approach. And other spots simply needed a precise line applied with the brush tip, and I did find that the smaller liner brush excelled there.
Now- it’s not “‘eavy Metal” by any stretch. It’s simply the first in what I hope will be a long run of models to help my learn how to better apply this technique.
I think that’s what is really the draw to me for modeling in general. While I do like the assembly, the painting, the finished products and so forth in and of themselves, I derive the most satisfaction from trying new things, improving my skills, and exploring ways to then meld those into my own “quiver of arrows”, ready for any target. Modelers I talk to who seem quite convinced of their skill are often the ones that can be blinded to their own shortcomings. I’ve seen this in others, and I saw it in myself.
So while this model is a thing in and of itself, I also see it as simply a step on a longer journey. I’ve had to set aside any notion of “perfection”, and focus instead on some basic goals that will hopefully solidify my overall fundamentals.
We’ll see.
Now that these initial basic steps have been completed, I’ll next focus on how to weather things to further improve the look.
Stay tuned…


Leave a Reply