No matter how many times you’ve done it, and no matter what method you use, masking camo patterns can be a bit of a pain. Over the years, I’ve tried various methods, including the use of “Silly Putty”/Blue Tac, paper masks, pre-cut vinyl masks, and even trying to solely use liquid masks. All had various levels of success, and all had advantages and negatives.
Still, when it comes time to mask, I keep coming back to the same tried and true, if somewhat laborious method: tape masks.
I think what I like most about them is the precision they allow. While some masking methods, such as using a masking putty, are simple in their application, it’s often more difficult to be precise if that is needed. And while it can give a scale-appropriate “feathered” edge, it’s very easy to end up with some “underspray” along various edges, requiring either tedious correction, or simply turning a blind eye to it.
Paper masks worked OK too, but often suffered from the same “underspray” issue as putty. And while it did allow for a very precise pattern, quite often the various curves and 3D shapes could not be properly accounted for by simply scaling up a 2D drawing.
Pre-cut vinyl masks seemed to hold promise, but in the three instances I tried them, I either ran into issues of the masks not being sized or shaped correctly to fit the model, the mask itself causing paint lift, or in one nightmare case- both. And they added extra expense.
Using nothing but a liquid mask was not bad, but as with the masking putty method, precision of application was not always great. And in a few cases, the masking fluid caused various color splotches on on the paint.
I certainly don’t mean to say none of these methods work. They certainly do. I have good friends whose work I greatly admire that would list one of the above methods as their favorite. So I in no way am submitting that the method I prefer – that of tape masking – is the “best”. It’s simply the one that I can get to work the best for me.
So in a fit of insanity, I decided to actually document the process. 🙂
First, you need a model that has the first color of a camo scheme already applied. I generally prefer to go from lighter to darker colors, though sometimes the paint type or color quantity and distribution can dictate otherwise. For example, if I know one paint type has poor adhesion qualities, and the other doesn’t, I’ll put down the “sticky” paint first, even if it is darker.
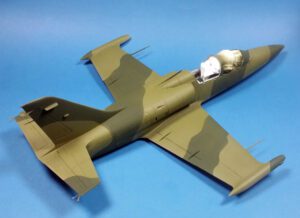
Here I have my Trumpeter 1/48 L-39ZA, freshly painted with a coat of Vallejo Model Air Interior Green. (The undersides have already been painted and masked off.
The tools for the task are important. I use a variety of Tamiya masking and curve tapes, as well as my hobby knife, tweezers, a cocktail stick, and a marker pen. Other tapes can work fine too, but be careful of using non-modeling masking tapes- they can often be quite tacky and leave residue.
I like to start by masking some of the flatter surfaces. For this, I get a large enough piece of tape that will allow me to define one “boundary” of the camo section. Before I place it on, however, I always, always, always “de-tack” the tape.
De-tacking is a process of reducing the stickiness of a piece of tape or other medium to adhere on the surface of a model. No matter how often people have insisted that “Tamiya tape never sticks”, I’ve had it lift off paint (water based acrylics in particular) if I do not de-tack it. It may not do it in every case, but if you don’t follow this simple rule, at some point you will be sad when you unmask.
De-tacking is easy. I simply stick the tape to the palm of my hand, pull it off, and do it again. The oils on your skin will diminish the tackiness. I can’t really give a quantity of times to repeat this – it depends on how oily you are, I suppose. 🙂 You’ll need to learn by experience. The point I go for is that the tape will burnish nicely and hold itself in place while being airbrushed, yet when being lifted will not apply too much resistance.
(I used to de-tack the tape on my forehead, until one time I forgot I had a piece up there, and spent the afternoon with a giant hunk of Tamiya tape stuck above my eyebrow, curious why my family was laughing at me more than normal.)
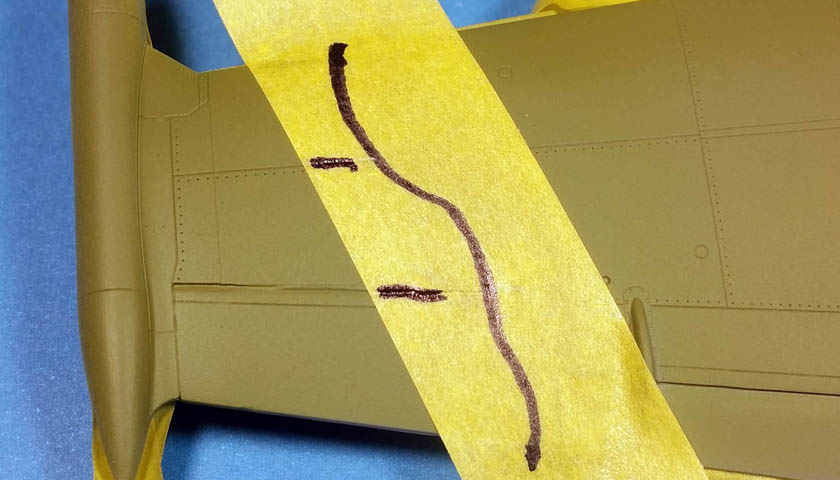
So I cut my piece of tape, de-tacked it, and applied it to the model. At this point, do not burnish it down – just set it in place enough to allow it to hold.
Next, I use my marker, and draw the pattern on to the tape, using the painting guide as a reference. I also add a few small marks to assist with aligning the mask once cut.
I then carefully remove the mask, pulling it back against itself. I don’t lift straight up, but rather try to keep the pulling motion parallel to the masked surface. In this case, I pulled from the front (leading edge) to the back.
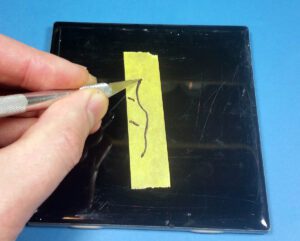
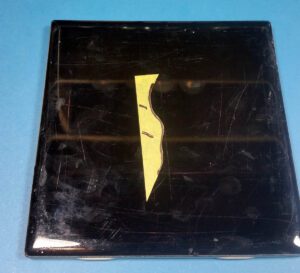
Once removed, I apply it to my handy cutting board – a small piece of tile. I prefer this over a green cutting mat as it allows for a very precise cut. Always, always, always use a new blade in your hobby knife to do this. Cut the mask a bit beyond where it will need to stop in this instance, so the excess can wrap under the wing. Once you have finished, lift away the excess – you now have a camo mask! (Or at least a part of one…)
Carefully remove your mask section from the cutting surface, and then apply it to the model, using the small marks as alignment guides. At first, I don’t push it down, but leave it a bit loose for fine adjustment. Once you are satisfied with its placement, push the mask down firmly with your finger tip or a cotton bud. I also like to use a cocktail stick to further burnish it down into panel lines.
Don’t forget the excess pieces you are left with – these can be used (if shaped reasonably) to apply to other sections of the camo area. Here I use some of the leftovers from the previously cut ection to mask the other side of this part of the pattern.
Now with the boundaries of this area defined, I use more tape to fill in the gaps. Be sure and de-tack these pieces too.
(Note- you can use masking fluid here, but in a few cases where I’ve done this, the masking fluid imparted a bit of color shift, which did not look nice. Your mileage may vary, of course.)
At this stage, I usually proceed with doing any other areas like this – get the “flat” parts out of the way first.
Of course, at some point, you will get to the more curved areas of the model, and this can require an adjustment in method and even tape medium.
In some instances, simply applying a piece of tape over the model’s curved areas, and following the same pattern as outlined above, works fine. However, this L-39 has quite a set of curves to it! So it’s a perfect way to illustrate the use of “curve” tape.
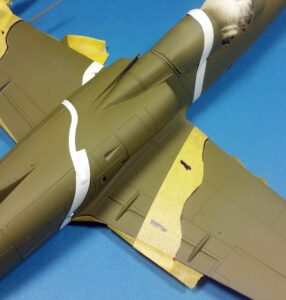
Curve tape is made from a more vinyl like material. It can be applied to the model, and as it is applied, curves and shapes can be imparted, so that you essentially lay down the pattern as you go. This allows for some very complex shapes to be negotiated that would otherwise be quite difficult using other masking methods.
I start by cutting a long enough piece of tape to fully cover the outline of the area being mask. Application starts at the area of the pattern where there is the least amount of curvature. This way it gives a firm basis for the tape to be slightly pulled as you apply it. Then, using either tweezers or my fingers, I apply the tape, shaping it as I go. I find it helps to focus on very small sections at a time, using one hand to apply the tape, and the other to hold the tape down. (For this photo, I had to hold the camera with one hand… 😉 )
Now, I’ll admit, the curvature here is quite extreme, and it just takes working in little bits, with constant adjustment, to get it all to work correctly. But when you are finished, you get a nice, masked boundary that adheres to all curves. With that section on place, I added the other “ends” of the boundaries for that area, using a combination of 2mm and 5mm curve tape. You can also see that on one side of the area that was relatively flat, I reverted to the masking tape method to define that.
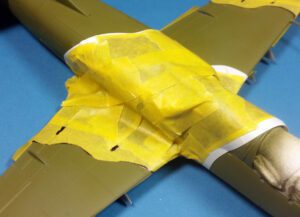
Now comes the tedious part – fill that in. I start with bigger chunks of tape, covering larger areas, and then use smaller bits of tape to achieve full coverage. You can use various putty material for this if you like. I simply prefer tape. (Call me a glutton for punishment…)
Once complete, the section looks like this:
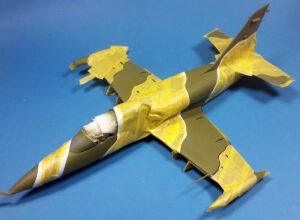
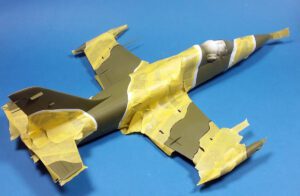
Now just continue doing this across the entire model. Remember to de-tack!
The next step is to paint your second camo color. Before doing that, visually check that all edges of masking are firmly burnished down. Also check that no small gaps are left in any areas between tape sections. With those checks completed, airbrush away!
When the second coat of paint is on, you can begin the joyful process of removing all the maskings. (And by joyful I mean mind numbing and soul crushing.) Do this fairly soon after applying the second coat. If it cures with the masking in place, the second paint coat may lift off at the edges when you pull the tape.
I normally start with the top layers of tape, and work my way down. Be careful to pull the tape slowly against itself. Don’t hurry this process. Some paint may lift – it happens. The most common reasons I’ve found for this are not de-tacking sufficiently, not allowing the first color to dry thoroughly, not allowing the primer coat to dry completely, or not making sure the plastic surface is free from oils before priming. And of all those, I think de-tacking is the most frequent culprit in my experience.
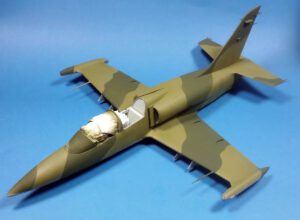
Once the tape is removed, you should have a sharply defined camo pattern on your model!
Some additional thoughts:
- If your camo scheme is more than two colors, you just simply keep doing the process outlined above for each color. Yes, this results in a lot of masking, but it does work. (See this F-4E Phantom.)
- You can use this method for brush painting, but it is very likely some paint will leak up under the masks. If possible, use a rattle can to apply a clear satin or matt varnish, which will help seal the tape edges. When you paint, don’t apply brush strokes towards the edge of the mask, but rather start on the mask and paint into the camo pattern.
- When I want to achieve a “feathered” edge look, I prefer to do a type of post-shading, using the lighter of the coamo colors. I thin the color, lower my air pressure, and apply the barest mist just to blur the lines. I think this imparts a much nicer scale effect. Also, keep in mind that later weathering applications will help blur the lines a bit.
- If you get some slight ridges in the camo scheme, use a paper coffee filter or a piece of soft cotton to buff them down smooth.
- If you don’t like this method, try one of the others listed at the beginning of this article. Remember – this is my preference, not necessarily the best way for everyone.
While this method is not the simplest, in my experience it allows for the sharpest and most precise patterns, and fully takes into account the complexity of shapes on any model. With a little practice, your speed will increase, the frustration level will decrease, and you’ll find variations and shortcuts of your own.
Please let me know what your favorite masking methods are, either in the comments below, or on my Facebook page! (While you’re there, give me a “Like” and share with your friends! 🙂 ) And if you have questions, please ask away! I may not know the answer, but I’ll make a valiant effort to at least be mildly entertaining in my reply.






Leave a Reply