
I’m not exactly sure when my love for Spitfires began. It’s one of those things that I don’t actually remember the beginning… it’s just always been there.
I know it has to be traced back to my dad. My love of airplanes came from him. He had his private pilot’s license, and I grew up thinking everyone took Sunday afternoon flights around the countryside. He talked of airplanes, and I listened. Many of his friends were pilots – more than a few were a few years older than him, and had flown aircraft in World War II and Korea. And living near an Air Force base, we had pilots living in our neighborhood, and many of those men had just recently returned from tours in Vietnam.
Dad loved airplane movies, too. So every time one came on the TV, we’d watch it. This was pre-VCR, and even cable at that time was fairly limited. So a Saturday afternoon watching the likes of “Twelve O’Clock High”, or “Flying Tigers” was a really special time. We’d sit and watch, and the whole time dad would be explaining the details of each plane, and the history of the events, and all other manner of information that my young mind absorbed like a sponge.
Introduction To A Legend
I think the movie that got dad’s attention the most was “The Battle of Britain”. It was an epic movie, with an all-star cast, and it tried to capture the events of that monumental air battle in the late summer and early fall of 1940. The flight scenes were made with the real things – real airplanes in the real sky. So while it did not always have the visual effects that can be achieved with today’s filming methods, it had a feel of authenticity that no CGI can replicate in my opinion.
Of course, the star of the movie was the Spitfire. Though it was the Hawker Hurricane that flew in greater numbers, the Spitfire’s fame was sealed in that battle. And my dad was a huge fan of the airplane.
it’s no surprise that it achieved such legendary status. Obviously its performance during World War II proved its value. It was one of the few aircraft that flew from start to end, in production the entire time. It was fast, maneuverable, and reliable.
Yet the Spitfire had a look to it that I think made it the most visually appealing fighter of the war in my opinion. Its designer, R. J. Mitchell, designed the Supermarine fighter in such a way that it was almost a piece of art. Flowing graceful lines, delicate curves, and a general sleekness gave it a look no other fighter of the war could really approach. While there were many good-looking designs to emerge from that era, I think none approached the Spitfire in terms of sheer “sex appeal”.
Building A Legend
My love of the Spitfire grows from not only my dad’s influence, and the way it looked, but also from a lifelong study of the airplane itself – where it flew, how it flew, who flew it. In fact, the more I learn about it, I truly feel like the less I know. There are so many little bits of data to absorb that anytime someone kindly uses the word “expert” in reference to me personally, I decline the honor. I generally tell them “I have learned enough to grasp how little I know.”
I have stacks of books about the Spitfire, far more than I probably need given our limited budget for such things. While I rarely read fiction anymore, or even long historical books, when I do read something hobby related, it is most likely to be about the Spitfire. I’ve even put together information that I’ve collected from the late Edgar Brooks, who was truly a Spitfire expert.
Of course, as a modeler, I’ve not only read of the Spitfire, I’ve built them. Many, many of them. My current count is 84 Spitfires. Most are in 48th scale, but I’ve built examples in all of the major scales between 1/24th and 1/100th. And of all the kits I’ve built, Tamiya’s 1/48 Spitfire Mk. I (and Mk. V) have consistently been my favorites.
Anatomy Of A Favorite
My choice of that kit as “favorite” is multifaceted. It’s not the most accurate in shape, though it’s no slouch either. It’s interior and exterior is reasonably detailed, but not astoundingly so. The parts count is fairly low – no more than 50-60 if memory serves me correct.
Yet of all of the nearly 300 aircraft models I’ve built, it is easily the most enjoyable kit I have ever built. Yes, there are many, many good and even great kits. Yet for the way I build, none has ever approached the enjoyment I get from Tamiya’s 1/48 Supermarine Spitfire.
It fits together without any problems. The kit can be built almost entirely without glue, even though it is not a snap fit kit, and it will generally hold together. I can recommend it to the most advanced builder, yet also hand it off to any 10-year-old as their first model build. All the while knowing that both will have a fun experience.
Big Shoes To Fill
When I heard that Tamiya would be releasing a completely retooled Spitfire Mk. I in 48th scale, I was quite excited, yet…
I was also a little worried. This wasn’t just any airplane. This was my favorite airplane, my favorite airplane model maker, and my favorite kit. As I pondered what the retool would be like, I actually hoped that aside from a few shape adjustments, and perhaps a bit more interior detail, that they really wouldn’t change much.
Of course, being that it was Tamiya, I had great confidence that the new tooled kit would be great.
Getting The Kit
When I picked up the kit from my favorite local hobby shop, Hayes Hobby House in Fayetteville, NC, I was immediately impressed with the look of the parts. They’d avoided the modern tendency to turn what should be a simple 1/48 scale kit into a 200+ part monster. In terms of overallt parts, the box appeared to have only a few more than my old favorite.
A few things were of immediate note. The cockpit parts are much better, with all the major components you’d expect to be in a Spitfire’s interior replicated nicely. The landing gear struts were ingeniously cast as a single piece, making sure that the odd angle of the Spitfire’s legs would be correctly set. Clever engineering allowed for minor variations in the early Mk. I variant to be modeled, and the parts make it apparent that a Mk. V version will follow. (Oh please, Tamiya… do a B and C wing variant…)
Overall, it was looking pretty good. But…
There was a photoetch fret included.
A Brief P/E Rant
I am not a fan of photoetch in general. While I have used it many times, I have always felt that if included in a kit as a primary part – meaning there is no plastic equivalent – it’s a poor engineering choice. While it works fine for some detail, it’s very lack of depth often makes it too flat for my tastes. And I don’t buy into the whole “scale thickness” argument. While photetch belts may be truer to scale, cast resin belts have a life, a texture, a look to them that I feel is infinitely more desirable.
I’ve often felt that many companies simply put p/e in their kits because of perceived modeler demand. Yet I have a theory that the loudest and most vocal modelers are among the least likely to actually build a model. The surveys I’ve taken, people I’ve interviewed, and simply anecdotal and observed data support this in my mind.
No matter that it’s fiddly to work with, and not friendly for the casual, beginning, and youth modelers. The fact that collector’s love to get wide-eyed describing the “gorgeous” photoetch a kit has… a kit that has been sitting on a shelf through three US presidential election cycles… seems to carry more weight.
So when I saw the photoetch fret, I was a bit concerned. Still, it’s Tamiya, right?
Getting To Part Where I Actually Build Stuff

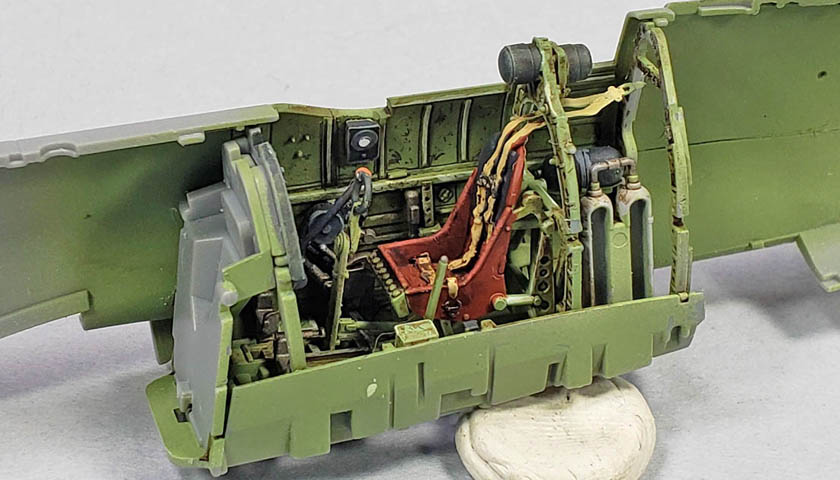
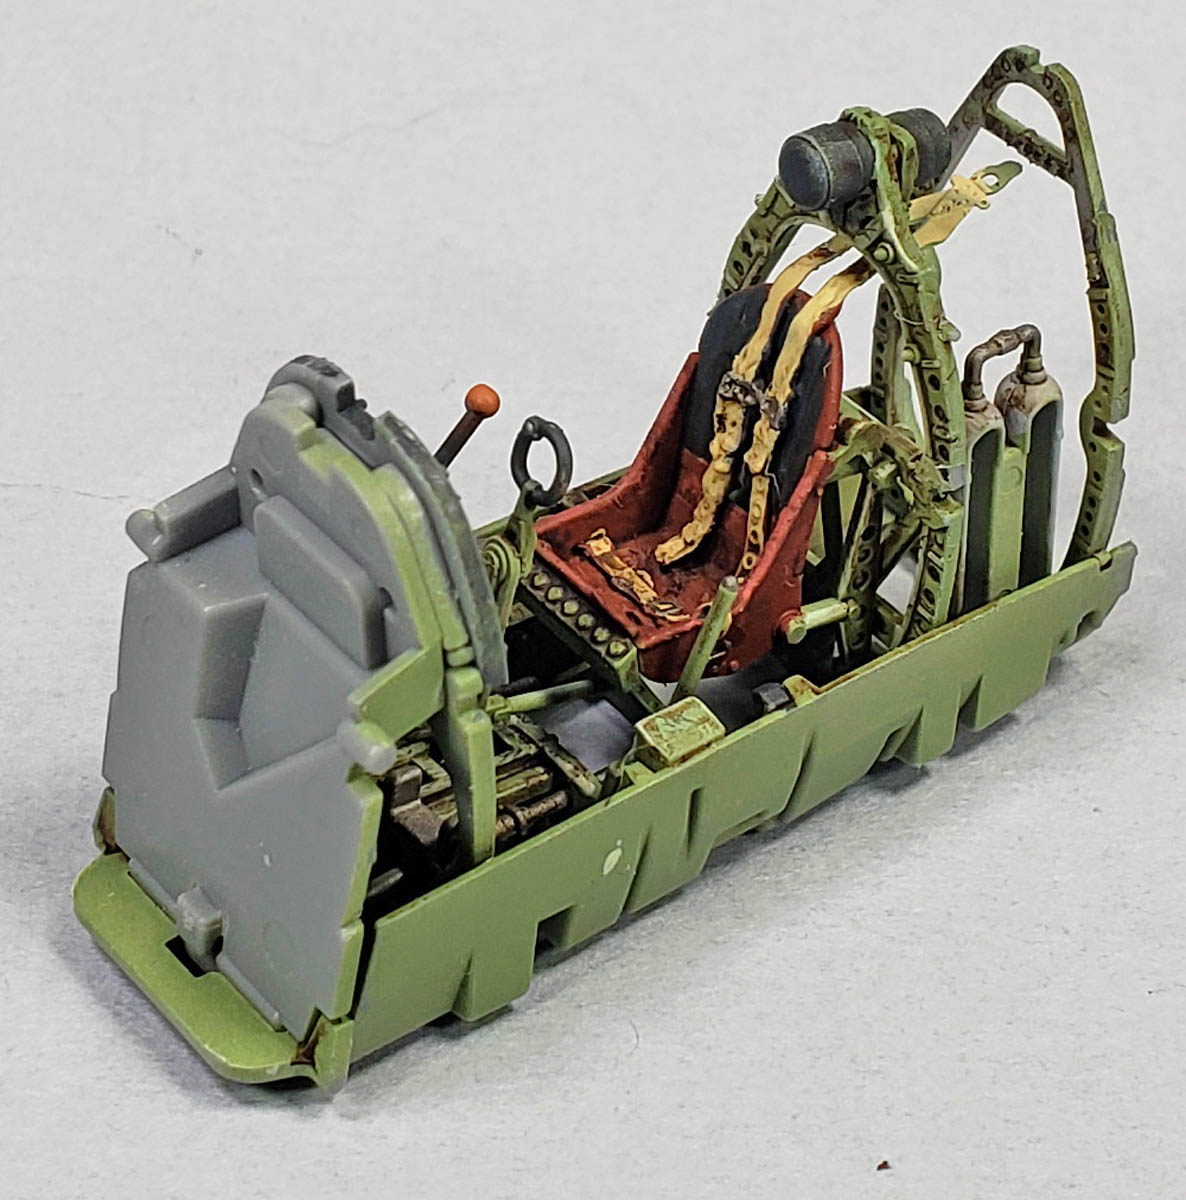
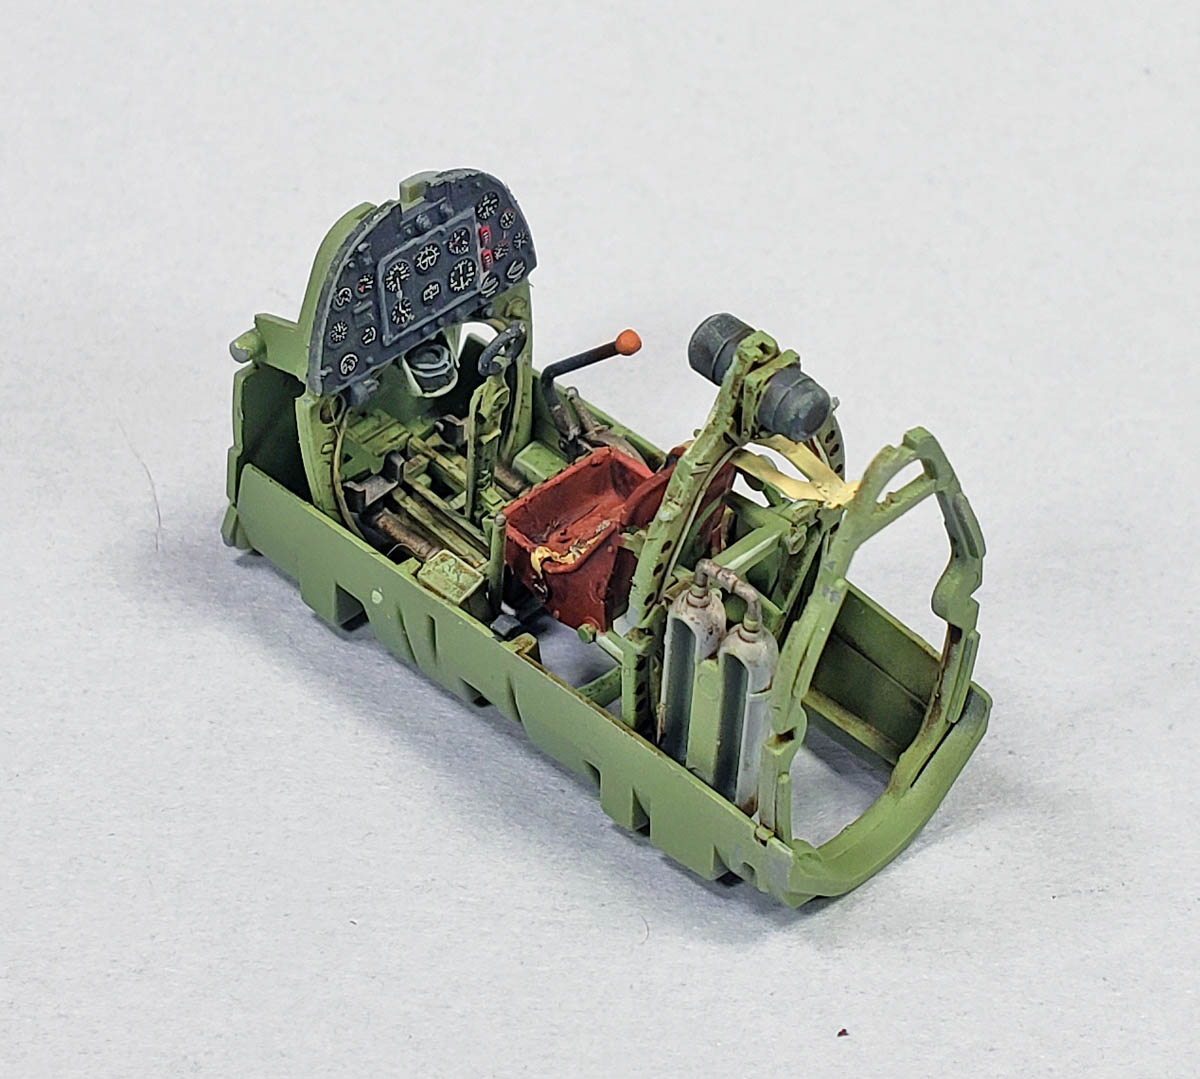
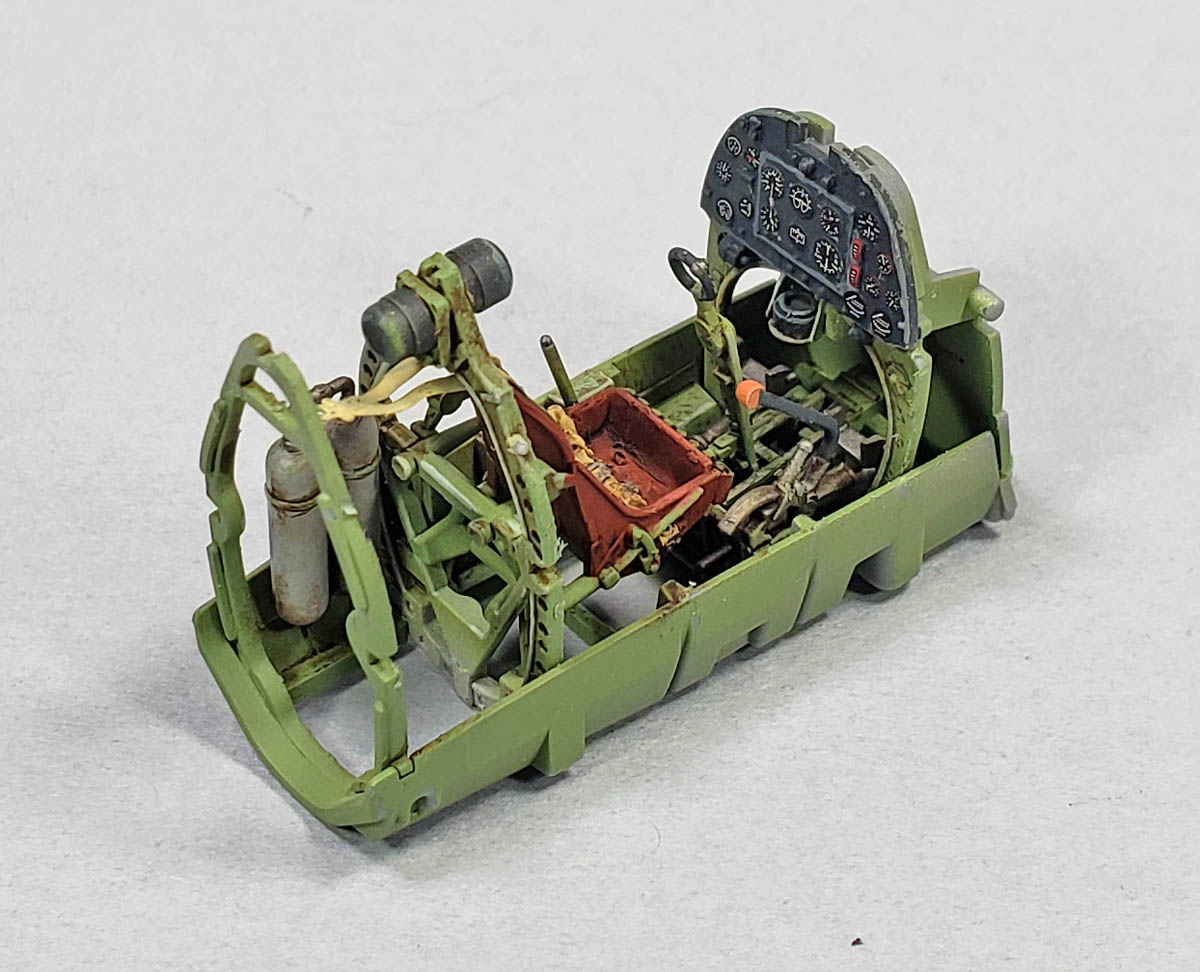
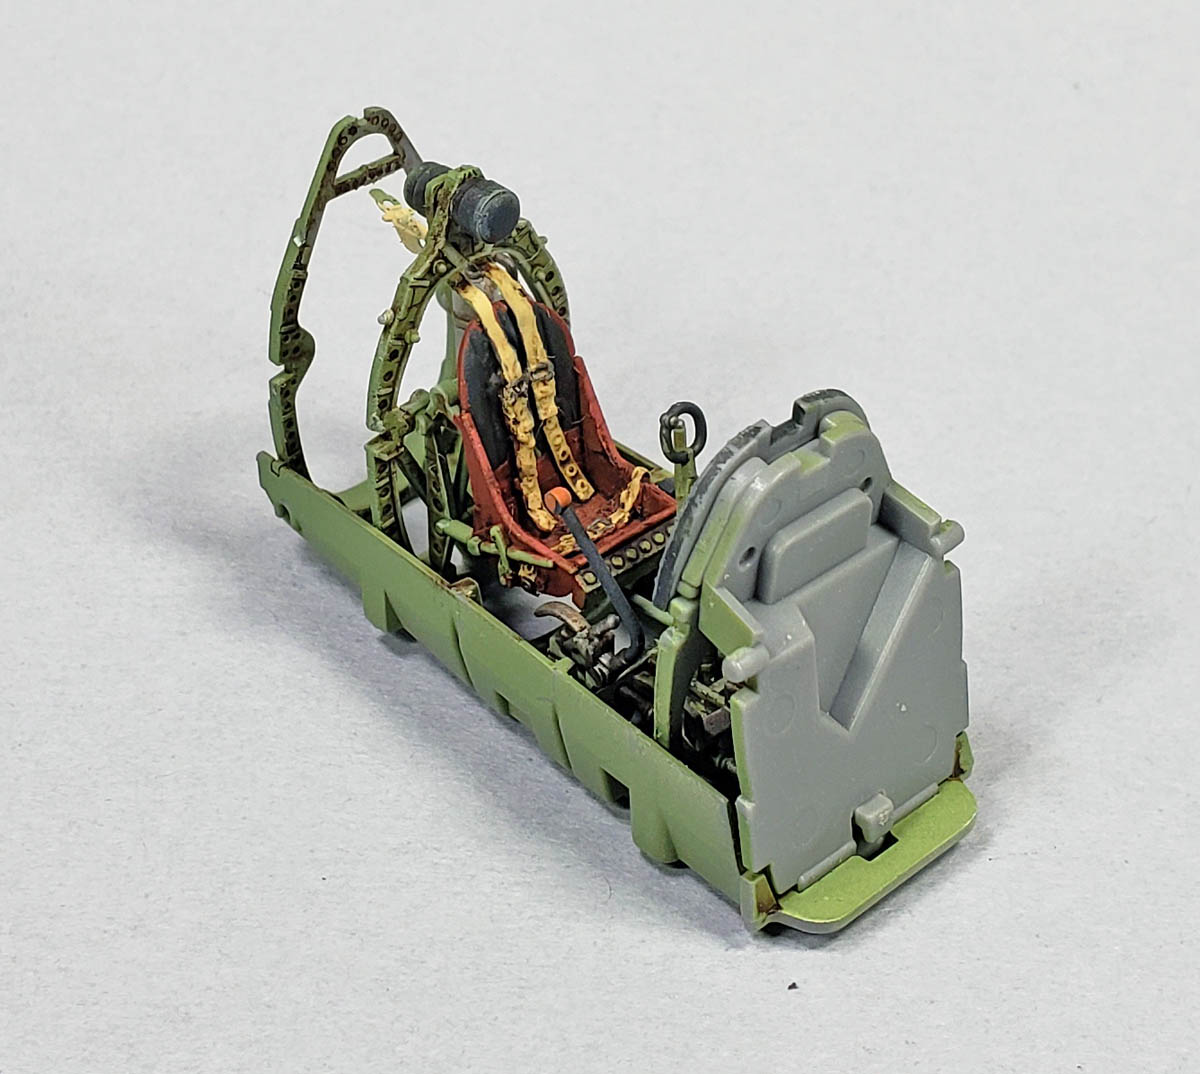
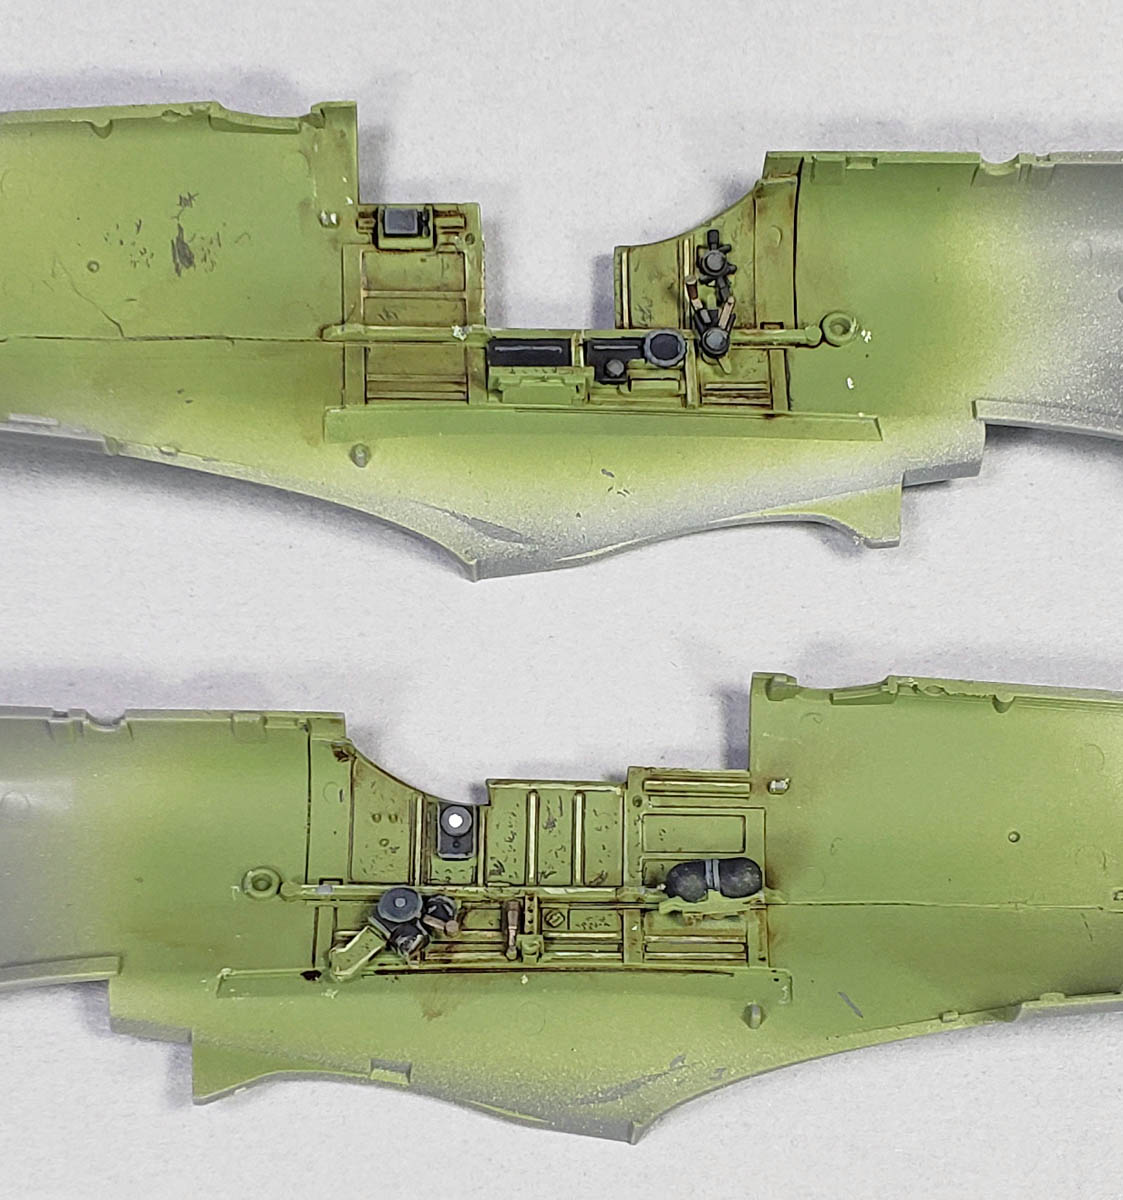
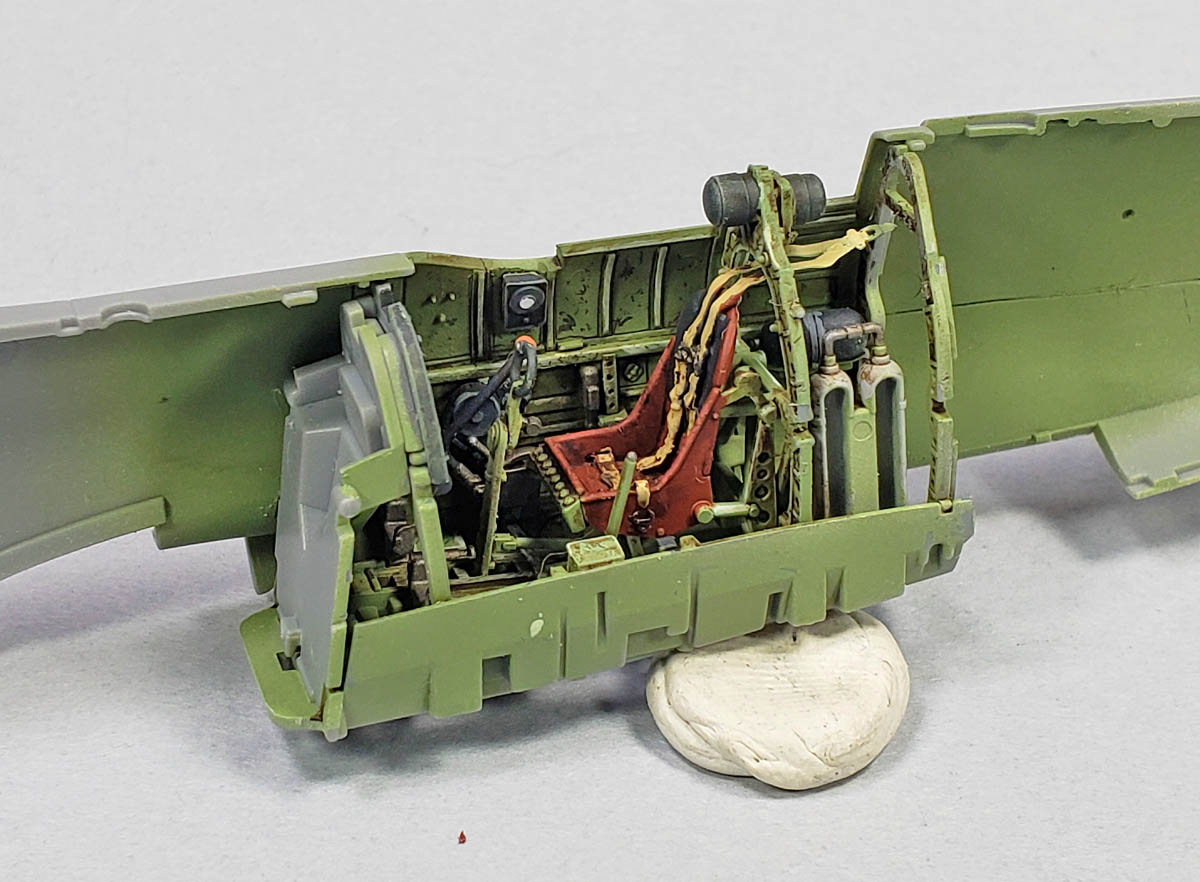
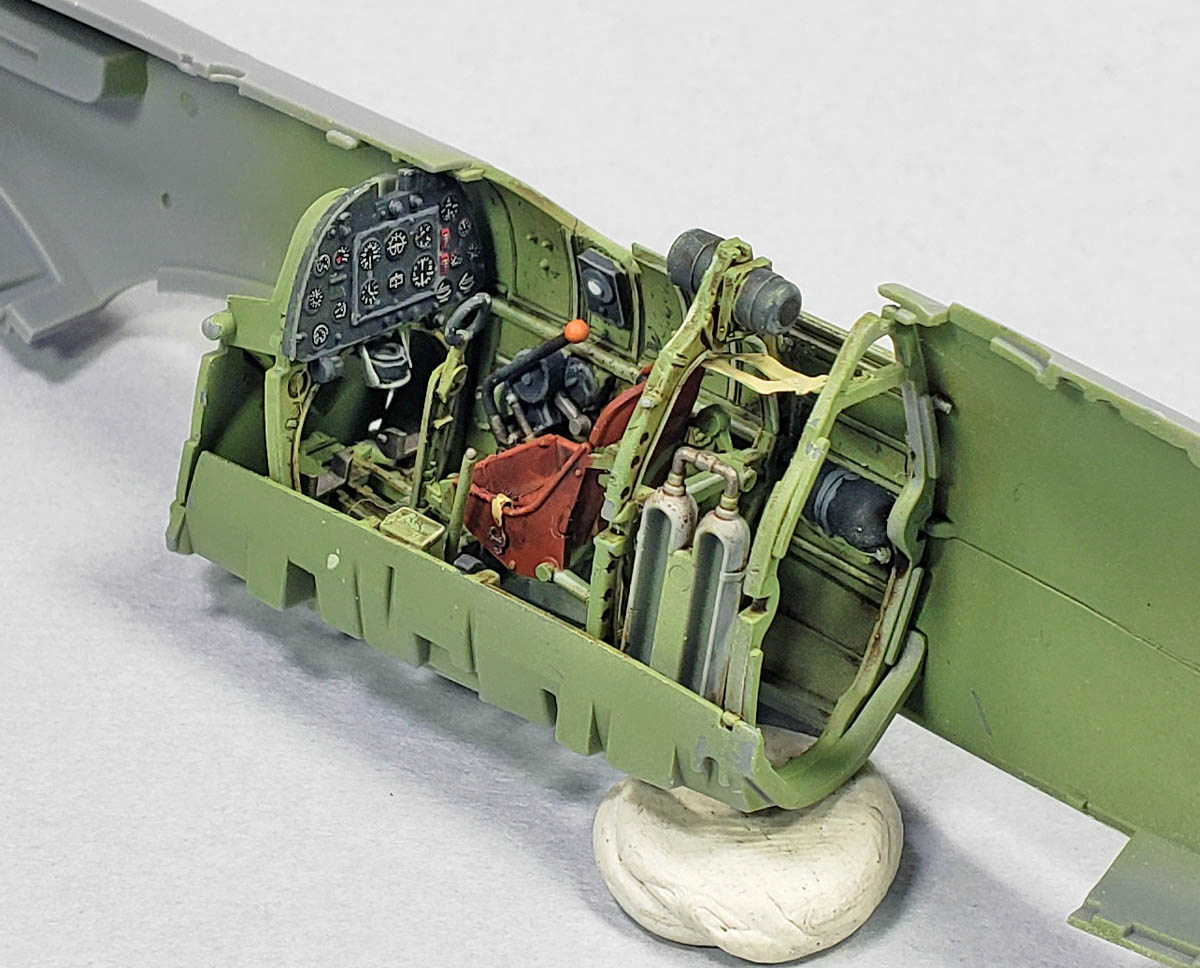
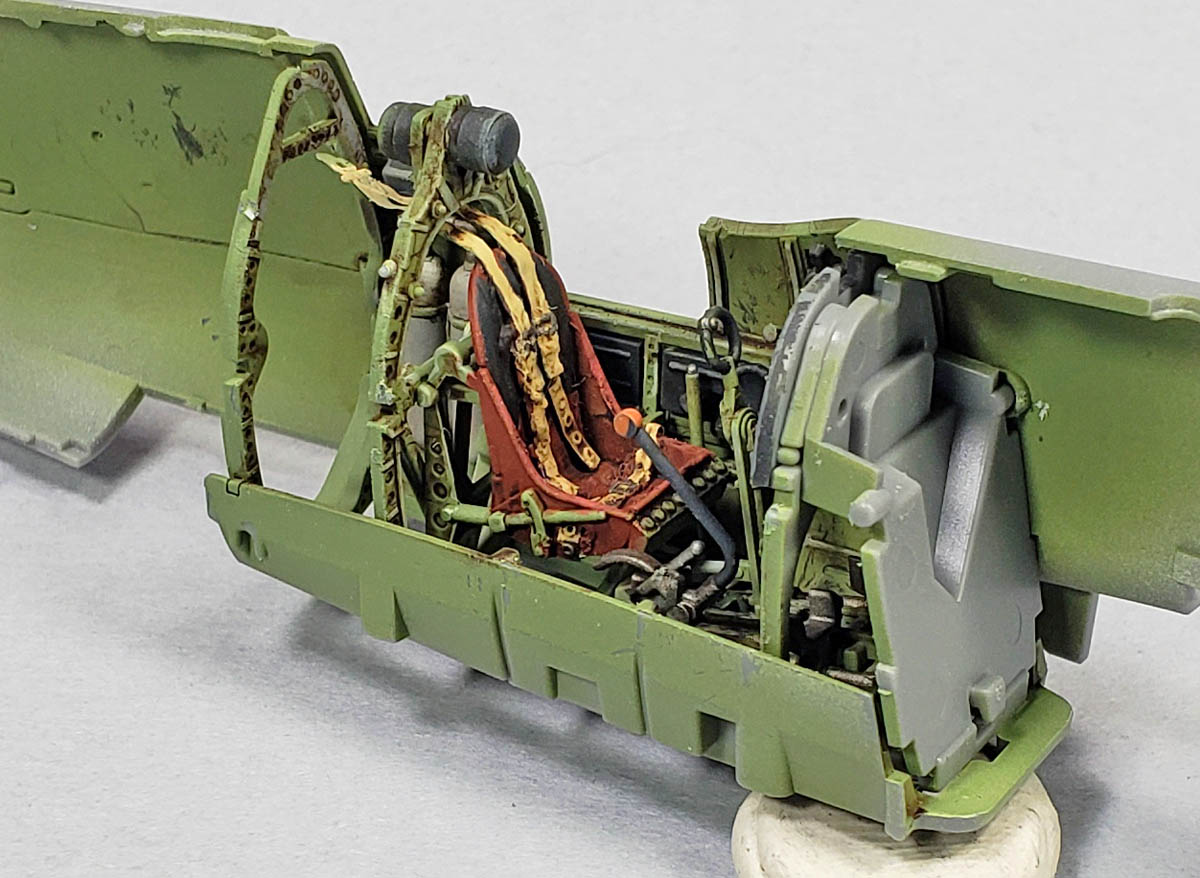
The cockpit assembly is rather simple, yet quite ingenious. The fuselage halves include molded in sidewall detail for the upper half of the cockpit. The lower half is added in as a “tub”, which also includes the major structural components. Various parts are glued into the sidewalls, and into the tub, and when all mated together, form an extremely detailed unit – yet retaining quite simple and mostly non-fiddly engineering.
The Spitfire’s seat was a unique looking component. It was made from synthetic resin bonded paper – not Bakelite as many will tell you. It’s color and shape were quite distinctive. In the old kit, the seat was quite underwhelming, and I normally replaced it with an Ultrcast resin seat with belts already cast in. This new tool kit contains a quite nicely shaped seat, though I do wonder if it is a bit undersized. (Perhaps all the others are too big? 🙂 )
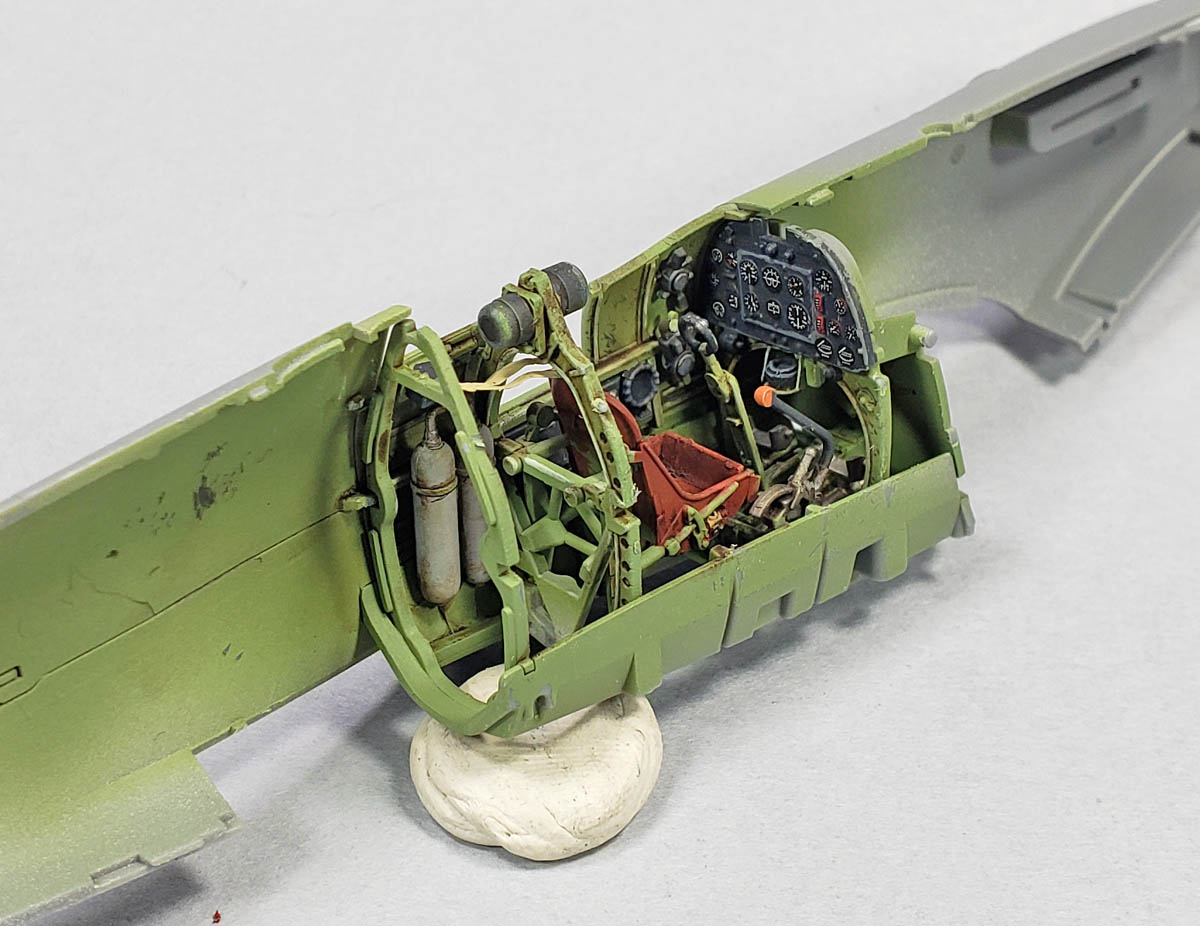
I assembled the parts in a fashion to not hinder painting, but to allow as many parts to be glued before hand to ensure a good join. The forward instrument panel areas was fully assembled, as was the rudder/floor assembly, seat and mounting, and a few smaller parts installed into the lower cockpit “tub”. All components that were to be glued on to the fuselage half interiors were also added in place.
That Dadgum P/E
The first hint of heartburn came when assembling the compass mount. The Spitfire’s compass was mounted along the bottom edge of the instrument panel, with the compass facing up. On most kits, this is either cast as a single plastic part, or perhaps as two parts – compass and mount. Casting the mount in styrene is a bit out of scale, but in terms of assembly, it’s quite simple to work with.
Tamiya provided a photoetch piece for this mount. Now, if that had been an option, I would have been quite happy with it. I’d have skipped the use of the p/e, and went with the styrene part. However… no styrene part was included.
To Tamiya’s credit, the p/e fret is made of a stronger, more rigid material than the typical p/e fret, so it was a bit easier to work with. And it fit nicely, the plastic compass popping right into place. Still – it requires super glue to join to the plastic, and while that stuff exhibits great strength is you try to pull it away, if sheer force is applied, or shock force, it tends to pop off.
I discovered this when I tried to pop the instrument panel section into the cockpit tub. And while I did manage to get it back in, my happiness factor with the kit dropped a notch or two.
Another area that had a “mandatory” p/e part was the upper part of the rear bulkhead. This section is under the small, aft canopy. It consists of a few holes drilled into the part. In most kits, this is represented by a series of recessed holes, which, if the modeler chooses, can be easily drilled out.
Yet again, Tamiya decided to make this a p/e part, glued on to the face of the bulkhead. As with the compass mount, the simple shock of putting the tub in place, and the few adjustments needed to get that lined up, caused the part to pop off. (For those asking… I used Gorilla Glue.)
Moving Forward Anyway
For the compass mount, I actually heated it up a bit, and stuck it into the plastic. That little…. thing…. isn’t going anywhere. For the aft bulkhead part, I simply threw it into the trash. I can just drill in the holes and be done with it.
For painting, I gave everything a coat of Vallejo gray primer, and followed that with a coat of Tamiya XF-71 Cockpit Green. Raised detail was picked out using a lighter cockpit green. I was aiming for more of a “Spanish School” look than a typical drybrush look.
Various boxes, buttons, knobs and other things that go “ping” were given a black paint coat, and highlighted with gray. A few white bits were also added in. For the instrument panel, I used the very nice kit decal. I normally like to paint those details, but time constraints dictated that I go the simpler decal route.
The seat was assembled, mounted to the frame, and the photoetch belts were added. The biggest problem with this step is something out of a model manufacturers control. The Spitfire belts were weird – part of it slid into a slot in the back of the seat, with another section extending far aft of the seat and into the rear of the cockpit area. One lap belt went over the edge of the seat side, while another went through a slot in the side. Tamiya molded good-looking belts, but after getting it all attached, with the associated super glue frustrations, I wished I’d simply substituted in one of Ultracast’s lovely resin seats. Still, the p/e belts are workable.
The seat was painted in a red-brown color, and the belts in beige.
Weathering
I decided for this build to depart from my ongoing acrylic experiments, and fall back on enamel/oil products. I started by lining the various recesses and panels with a sharpened .5 mm mechanical pencil. This lays a strong foundation for a high contrast shadowed look. A gloss coat was added, and then thinned artists oils flowed into the recesses.
Paint chips were introduced with the mechanical pencil. This makes some very fine, scale appropriate chips, and they can be applied with great control and precision. If added prior to the matt coat, they show as a nice dark gray. If applied after a matt coat, they retain a bit of the graphite shine.
More oils were added her and there, just toi simulate a few stains and splatters. I wasn’t going for over the top weathering on this one, but rather a simple look that would (hopefully) replicate a somewhat newer but still used cockpit.
Getting It All Together
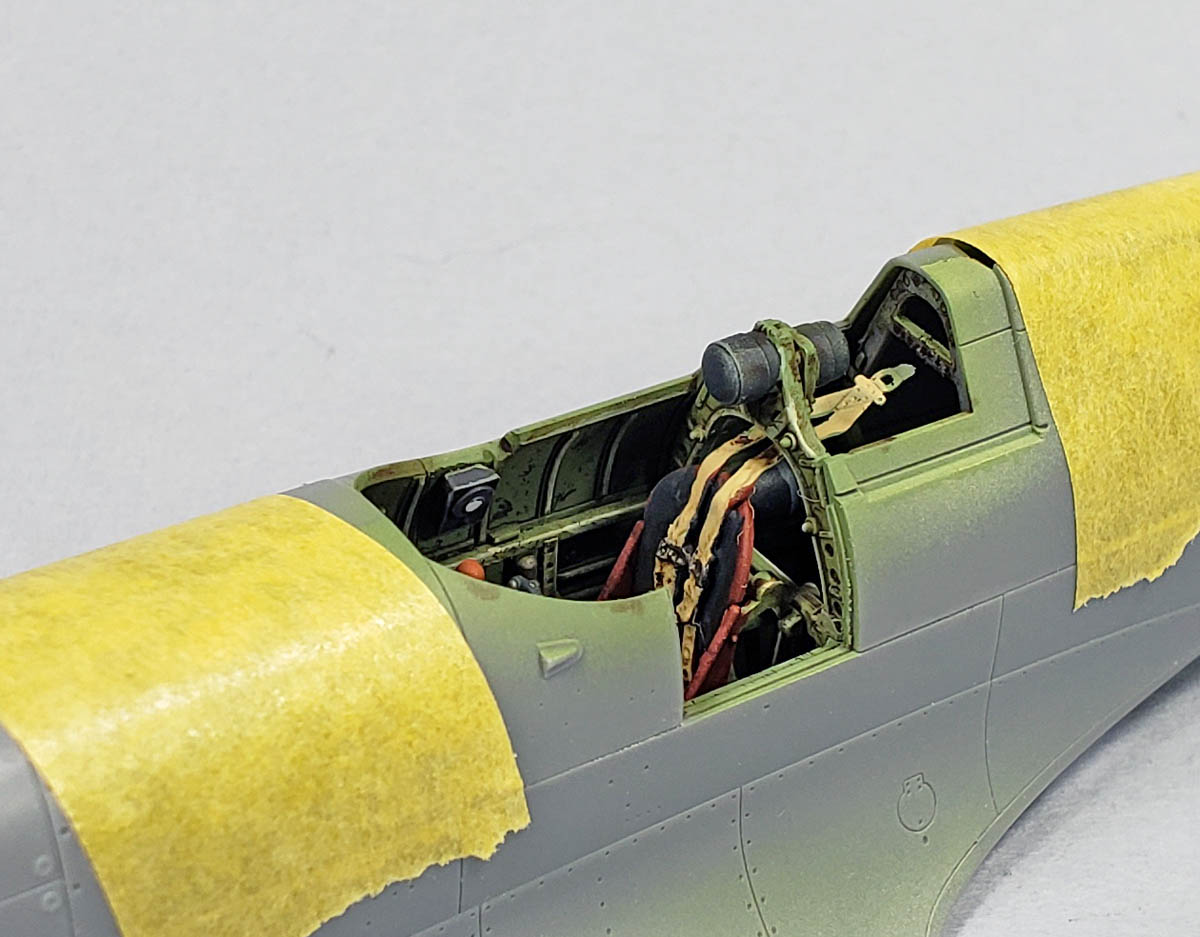
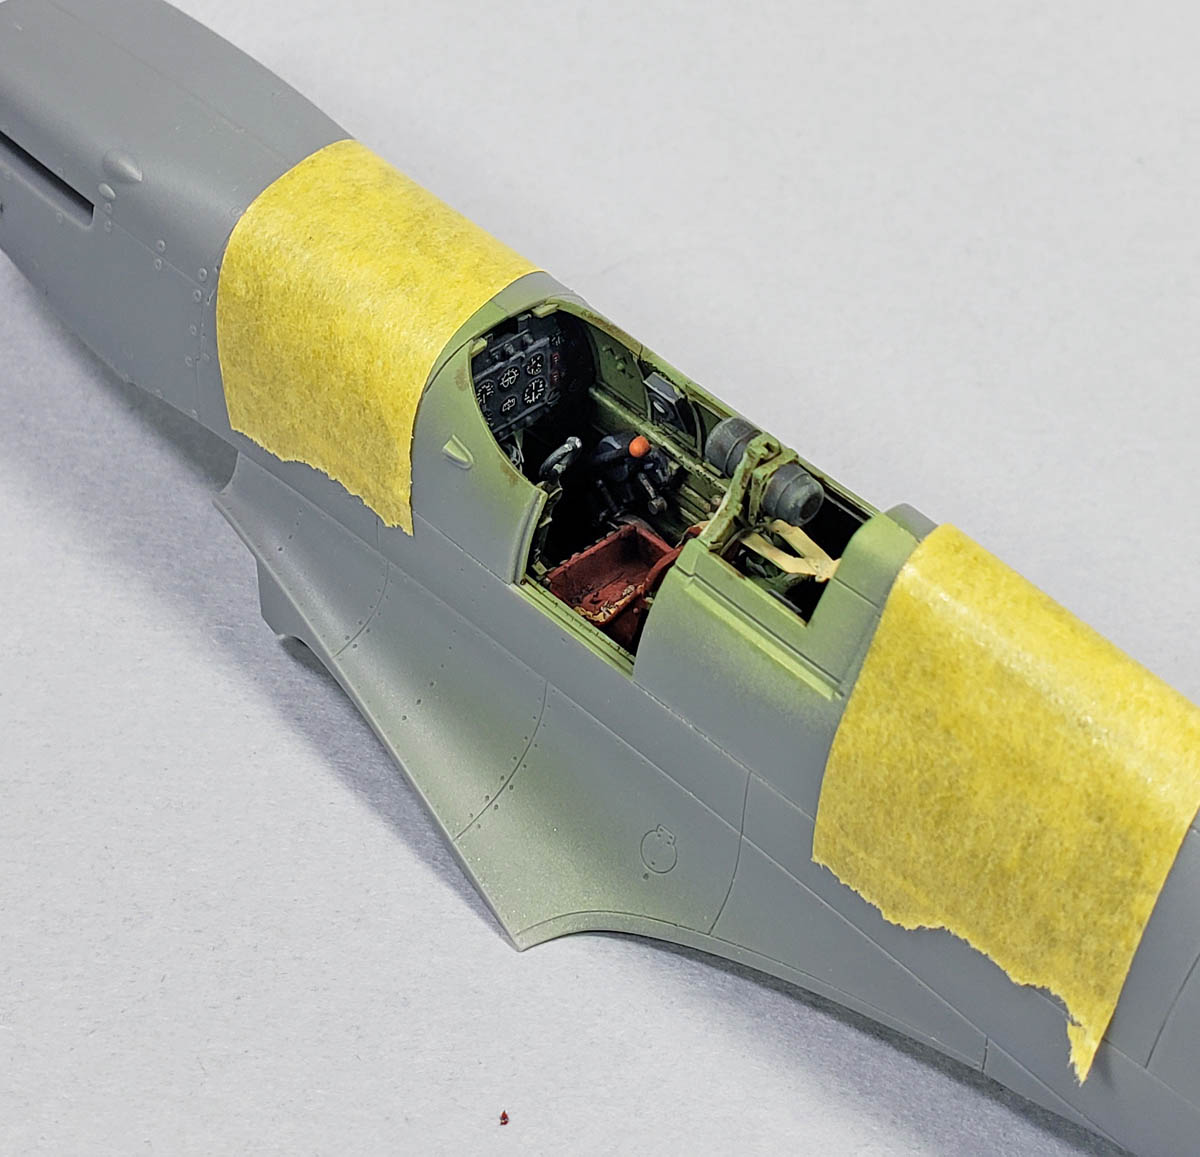
Fitting it all together was no problem… it is Tamiya. Good location pins and tabs inform the modeler as to exactly where all the parts fit. I actually did not glue in the instrument panel section, nor the seat’s bulkhead. For one, they fit snugly enough without glue. Second – and more importantly – not gluing these parts in allowed for some adjustments to be made while fitting the cockpit tub into the fuselage half. Once in place, the other side was test fitted, showing that there will be no gaps when all is glued into place.
An Early Assessment
So far, I am really enjoying the detail of this kit. It built on the strengths of the old tool, and added in additional finesse that really makes it shine. While I think the Eduard Spitfire’s cockpit may be a bit more part heavy, I believe the Tamiya kit captures the look just as well, yet in an easier to build format.
Still, I can say I am a bit disappointed at the use of photoetch for some of the primary parts. (And a perusal of the instructions shows more are coming…) It’s not enough of an issue to say that sticking with other kits is recommended. Simply leaving out the rear bulkhead p/e, and using epoxy glue instead of super glue for the compass mount will address those areas.
What I am seeing is that I don’t know this will be the kit that I can recommend to any builder, regardless of skill level. I had confidence that what was in the old tool box could be built by anyone – even a kid. The inclusion of mandatory photoetch parts in this new kit – an inclusion which I firmly believe is not necessary – is a bit of a disappointment. My hope Tamiya does not continue to do this on future kits.
I can say with confidence that the majority of modelers will be quite happy with the results of the cockpit build on Tamiya’s new tool Spitfire Mk. I. It looks like a Spitfire cockpit, plain and simple. I don’t think anyone else has done this nice a job of fine detail that is easily built, and looks great with just basic paint and washes.
Next up will be assembling the rest of the fuselage, and getting it ready for paint!
Leave a Reply