The web is a great resource for modelers. Just about any technique or product has a blog article, video, or forum discussion about it. Some of them are a great help. But often, many of the techniques demonstrated don’t quite work as easily or as fool proof as is shown. It’s not that the person presenting things is being dishonest. But things often presented as “fool proof” have never come up against me. I’m usually the exception to the rule.
And that’s how it’s been with natural metal finishes. I’ve tried just about every product. Alclad, Model Master Metalizer, virtually ever acrylic metallic product on the market, various rubbing compounds… you name it. For some reason a nice metal finish has always eluded me.
So I’d basically just given up doing anything with a metal finish. And it was a shame too, because there are some really cool looking subjects available.
Then a few weeks ago, I saw Spencer Pollard’s video on using decanted Tamiya AS-12. It looked so simple. And so good.
But it couldn’t be that easy, could it?
I was a bit skeptical. Certainly not of Spencer- not by a long shot. But I know how badly I could mess up a metal finish.
Yet in my quest for a metal finish product I could actually get to work for me, I thought “why not?”
So a few days later, armed with my brand new can of Tamiya AS-12 Bare Metal Silver, purchased at the best model shop in the world, Hayes Hobby House, I was ready to get started.
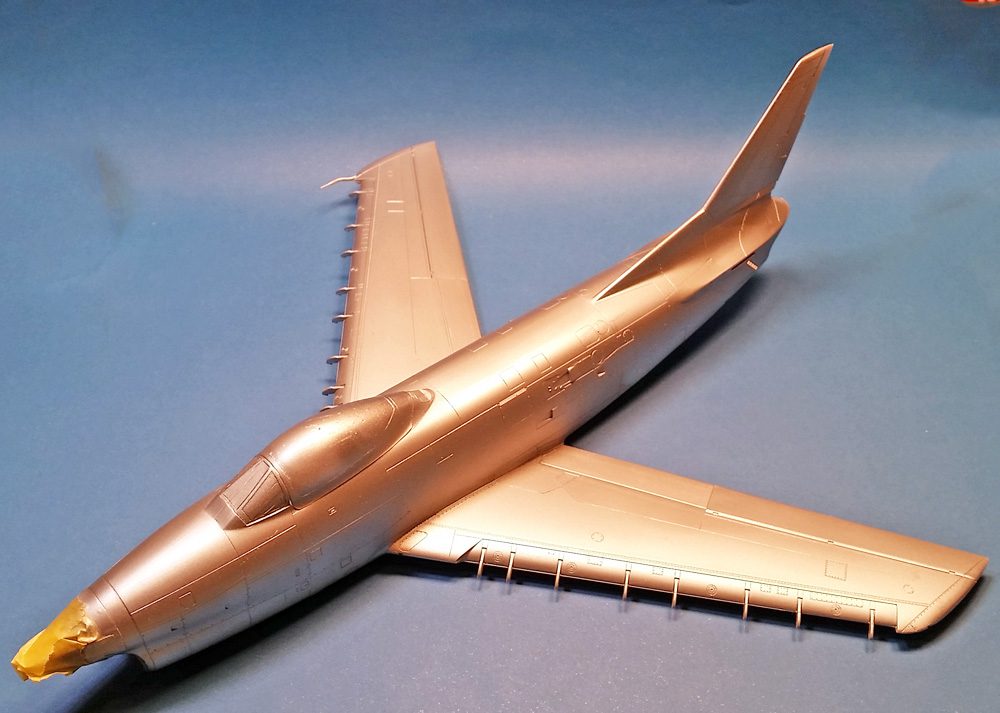
The victim kit of choice was Revell’s 1/48 F-86D Sabre Dog. It fit my criteria for the project- it looked cool, had a metal finish, and it was cheap. OK, the main criteria was it was cheap. (But I’ve since found out it is an AWESOME kit to build…)
Following Spencer’s instructions, I decanted a some paint into a jar without any trouble. No muss, no splatter, no problem.
I decided to give it the most basic of tests- just apply it right to the bare plastic. I did sand the seams smooth (mostly), but I really did very little surface prep.
Mixing the AS-12 in my airbrush with Mr. Color Leveling Thinner (at roughly a 50/50 ratio), I began to spray.
And it worked. I mean- it really worked. It was smooth. It was shiny. It was even. It looked like metal.
I almost jumped up and whooped for joy.
Finally something fool proof for this fool!
I did spot a few seams. As with any metal finish, it’s not forgiving of seams and gaps where parts join. However, it was more forgiving of surface imperfection- faint scratches that I’ve seen with other finishes disappeared with the AS-12. But there is no substitute for good seam work. I need to put some time in there on my next build.
But it gives a great, very real looking metallic finish.
My next experiment on the F-86D will be to try a few more Tamiya metallic sprays, to give some panel variation.
If you’ve not seen Spencer’s video, jump over to his site and take a look at the original video, as well as a follow up he did to answer any questions.
I’m really excited about this- I’m already compiling a list of shiny happy airplanes to build. This has essentially opened up an entire genre of modeling that I had shied away from.


Leave a Reply