How did it take me this many years building models to “discover” Bandai?
For a decade, I’d built aircraft models. Some from good manufacturers, some not so good. As I’ve mentioned before, I hit a spot of “burn out” with regards to aircraft, and so I decided to try Gunpla. It was immediately apparent how good Bandai kits are.
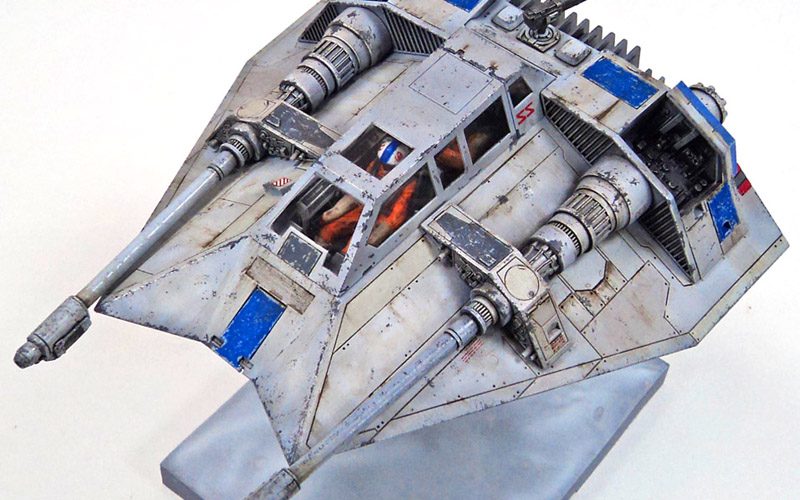
So with new eyes for new subjects, I picked up Bandai’s Star Wars 1/48 Snowspeeder, hoping that the same fit and engineering present in their Gundam were in this kit.
And happily, I was not disappointed.
As with any modern Bandai kit, the parts are cast in just about absolute perfection. In aircraft modeling, I’d always thought of Tamiya as the gold standard. Move over Tamiya…
The parts breakdown is very logical, and as with all of the Bandai kits I’ve encountered, this one is snap fit. And it’s perfect fit. Not “snap fit but you better glue it so it doesn’t fall apart”. It can be built and painted with no glue, and unless you deliberately try to pull it apart, no one is the wiser.
I painted the cockpit parts separately, to allow me to be able to access everything easily. And while I did look at the provided cockpit decals for inspiration once, it’s pretty much from my own imagination. Real cockpits may be pretty bland, but in my mind, scifi cockpits are supposed to have lots of flashy lights and colored buttons- so I did just that.
Painting the pilots was a little bit of an exercise for me, as I’ve not painted figures before. I gave them a coat of Tamiya Orange, and then picked out various bits and pieces in grays, tans, and of course a few flesh colors for the face. Everything was given a coat of Citadel’s Nuln Oil to shade the recesses, and I set them aside and called the figures done. Not perfect- but they’ll do.
Assembly of the airframe itself was a breeze. It’s Bandai… 🙂
I assembled the kit fully, leaving only the main cannon barrels, rear “grill”, harpoon gun, and upper and lower spoilers off. Parts are provided for closed or deployed spoilers, but I decided to go with the open spoilers all around. The kit also provides two canopy options- a traditional clear part, and a two part canopy that separates the framing from the clear part, the latter simply snapping into the frame. I decided to go with the more traditional approach, as I knew I could mask it off, as the framing was nicely recessed.
Painting the Snowspeeder
Painting was done in a few layers. I started with Badger’s Stynlyrez Black Primer, followed with a coat of Tamiya Neutral Gray. I then mottled a coat of Tamiya Sky Gray over that, making sure to leave it a bit patchy. Finally, I applied a highly thinned coat of a mix of Tamiya White and Sky Gray, in some areas focusing on open panels, in others just misting it on. I don’t know that I was using any thought out method, but rather just looking for a TLAR standard. That Looks About Right. 🙂
I then picked out a few panels with various gray shades by hand, just to have some surface variation. I waffled about some trying to decide on for the stripes (red or gray), finally deciding on a non-canon blue. With the basic colors on, I could begin the weathering.
So Explain Again Why It Has Blue Stripes?
All of this is make believe. Hate to say it, but it’s true. And while the movie showed either gray or red stripes on the Snowspeeders, I wanted something different. I decided on blue. Here’s my background story…
This Snowspeeder was part of Blue Squadron, called the Blue Deuces. Their job was to guard to rear sector of the Hoth base. It wasn’t a very glamorous job though, as all that was out back were some supply storage containers, the trash dump pile, and the port-a-potties for the enlisted personnel. (And also that place Luke was standing when he waved at the Millennium Falcon taking off. Like they could see him…) Plus, they didn’t have a budding Jedi among their ranks, so of course no one wasted camera time on them.
They did, however, manage to protect all the port-a-potties, so everyone had a place to relieve themselves during the battle.
That’s my story and I’m sticking to it. 🙂
Weathering A Snowspeeder
The weathering was a multi-layered approach, though as with the base paint, I don’t know that I really started out thinking that was the goal. I did some drybrushing just to bring out edges, and then used various darker grays for chipping, using drybrushing, painted, and sponge methods in various places.
Larger panel lines were accented with Nuln oil, and then I applied a gloss coat. All the panel lines were then given a wash of Ammo of Mig panel line washes, with several colors being used for variety. (Though, admittedly, it all pretty much looks the same…)
I then applied Ammo of Mig Engine Grime to various places for streaking, and when that fully dried, I added more stains in with Ammo of Mi Oil Brushers, using Starship Filth as my color. A few decals were added on next, and some weathering applied to them.
I applied a few more touch-ups of weathering and color here and there, and then gave the entire airframe a coat of ultra matte varnish. I removed the masking from the canopy, popped it open, stuck the pilots in, closed it up (not glued!), and stuck it on the stand.
And I have to say, I am really, really happy with the result. Though I sell all of my work, as we really need the supplemental income, I will be more than a bit sad to part with this one. While I’ve never built a model that ended up looking like I initially envisioned in my head, this one was tantalizingly close. And as I absolutely loved The Empire Strikes Back as a 13 year old kid, this one is especially meaningful to me. Still… family needs first. Oh well.
I suppose I could build another. 🙂
This is a kit I can recommend without hesitation for any modeler. A child can build it right out of the box, snapping it together, and get a really nice result. (Waterslide and stickers decals- very extensive sets of both actually- are provided.) The beginning or intermediate modeler can build this and be quite satisfied with any level of painting and finish, and the advanced modeler can really “go to town” on it, as the kit is an amazing canvas for creativity.
And this won’t be my last Bandai Star Wars kit! I already have the 72nd scale X-Wing Fighter waiting in the wings!


Leave a Reply