I got my first job just after I’d turned 15 years old. My next door neighbor, who owned an orthotics and prosthetics business, offered to let me come in with him on Saturdays and go general cleanup and other basic tasks in their work area. The minimum wage that year was $3.35, but to my young mind, that was a good enough sum. He said we’d work 8-10 hours each Saturday, and though my math wasn’t the best, I reckoned that would come out $67 every two weeks – far more than I’d ever held at any one time. Even on my birthday.
The first day was a cold day. I figured we’d be working inside, so aside from a light coat, I didn’t put on too much snivel gear. Walking over to his house at the appointed time, he greeted me warmly, and asked if I wanted to join him for breakfast – at a buffet!
Could this day get any better?
We headed over to the local Shoney’s, a family style restaurant that featured a very large buffet line, full of every imaginable breakfast item. There we met his brother, who worked with him, and another employee. All were Vietnam veterans, and seemed to enjoy the starry-eyed way I listened to their stories of everything from Army time to the latest hijinks in the office.
I couldn’t wait to get started on the work!
Arriving at the office, I was shown around the “front office” area, and then we went to the back room, where all the work took place. Tools of every kind imaginable lined the walls and work benches. It was very busy, very workmanlike – but still quite tidy and neat. The first task I was assigned was to sweep up the work area. They explained this was very important. Plaster castings were used to create prosthetic limbs, and so there was quite a bit of plaster dust falling to the floor. Keeping that and other debris swept up was an ongoing battle.
So sweep I did. I was quite proud of myself too, getting into every nook and cranny. After finishing, I checked the time. That took all of 5 minutes. What next, boss?
My neighbor took me outside, in back of the building. Explaining that they reused the metal pipes that the plaster casts were formed around, he demonstrated how to use a rubber mallet to knock the plaster off the pipe. Though he’d done it many times, I could see it took no small amount of effort.
After showing me how to do it, he handed the mallet to me, and observed my initial efforts. He offered some pointers, then finally satisfied with my work, he said “Come over here. I’ll show you where we keep all the casts that need to be cleaned up.” Opening a storage room door, he motioned inside. My heart sank.
There were dozens… if not hundreds… of plaster castings piled up, with their metal tubes sticking out. He said it would probably take me a while, and I’d likely not finish that day. He’d check on me, of course, and let me know when it was lunch time. Then he headed inside.
I checked my watch. It wasn’t even 8:00 AM yet. My decision to wear only a light coat now seemed a bit… dumb. Not half an hour into my first job, I was ready to just go home.
I stood staring at the mound of work before me.
Assembling the Y-Wing
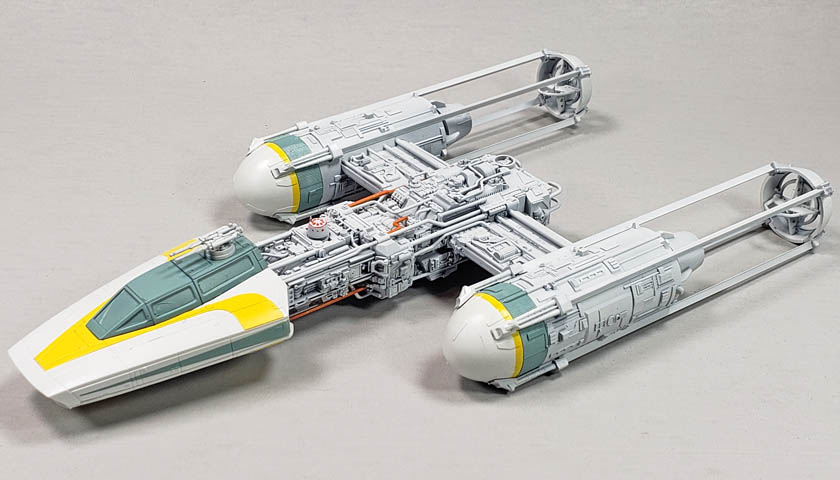
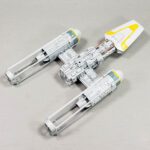
I typically spend a bit of time before each build looking over the parts and instructions. I’ll make a few notes on the instruction sheet to alert me to areas I need to be aware of, or to mark where some deviation in the suggested build order may be helpful. When I’d examined the Y-Wing, it seemed logical to divide the initial assembly and painting into three main stages – forward section, fuselage, and engines. I’d detailed the painting and assembly of the cockpit and forward section in a previous blog. That step was fairly simple, and didn’t take long at all.
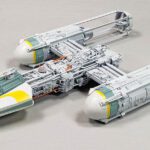
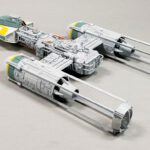
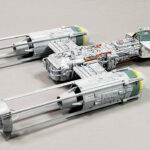
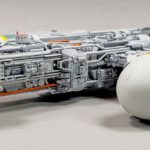
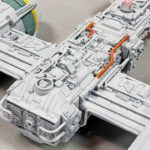
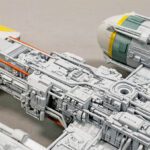
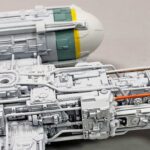
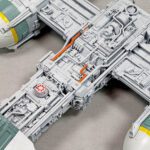
Part of the reason I’d decided to break the build up in that fashion was because of all the pipework on the main body of the space fighter. And entire sprue was dedicated to nothing but the tiny, fragile pipes of all shapes. A few were straight, but most had various kinks and bends involved, with all manner of pins and blocks designed to fit into various recesses and holes in the main body.
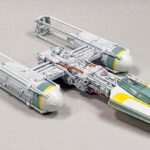
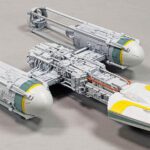
It’s hard to adequately describe the absolutely stunning detail Bandai molded into this kit. While I’m no Star Wars studio model expert, I can only assume they replicated every single detail. The amount of greeblies that adorn the surface have probably never been equalled in plastic, especially at this scale.
Assembly of the basic “T” shape that makes up the main fuselage and engine mounts went together fairly quickly. As with all of the other Bandai Star Wars kits I’ve built, the precision of fit was impeccable. In fairly short order, I had the basic shape ready to go.
And then I looked at all those pipes.
I Said More Greeblies
The instruction sheet gives some indication to the intricate work that lay ahead for the modeler. The sheet folds out to the size of an old road map. If you’re old enough to recall the days of navigating by paper map, you’ll get the picture immediately. Unfold the instruction sheet, refold it to the part you need to see, then when you finish those steps, repeat the process.
I do really wonder what happened at ILM that resulted in the Y-Wing. I can almost picture the props guy, showing his initial work to George Lucas. He raises an eyebrow, and says “needs more greeblies”. So back the prop guy goes into his shop. A few hours later, he shows Lucas his work. “I said more greeblies.” Drawing his breath, Mr. Props Guy heads back into his shop.
After several more hours, the work is again shown to Lucas. “I said more greeblies! Don’t come back until you add more greeblies!”
Frustrated, the prop guy goes back into his workspace. Forgoing sleep, food, and even bathroom breaks, he works feverishly for days. “If it’s greeblies the bearded wonder wants, then greeblies the bearded wonder gets!” Plastic and glue and paint fly. Finally, he emerges from the shop.
As he walks past the other designers, all stop and gasp. They point, their eyes wide in amazement. Bringing the work to Lucas, he holds it out in front of him. George squints as he examines it. He looks it over, nodding. Finally, he looks at the prop guy.
“Don’t ya think you maybe went overboard there? Why so many greeblies and pipes? Oh well, we can use it like that I suppose.”
The haggard prop guy, eye twitching, looks up into nothingness and shouts “Whyyyyyyy!”
Lucas then perks up. “Hey – good idea! We’ll call it the Y-Wing Fighter!”
😀
Back To The Pipes
OK – it may not have happened that way. But trust me… there are a lot of pipes on this thing.
Bandai was helpful in how they broke down the instructions. Each piece of pipe gets its own sub-step. The piece is clearly shown, with small inset diagrams to indicate where it is inserted, and which end to insert first. Having now assembled all twelve bazillion parts, I can assure you it will all fit. However, if you build it, know that it is absolutely imperative that for every single step – and I literally mean every single one – that the model and the part being applied are oriented as shown in the instructions. With the forward section and engines not yet mounted, it can be hard to distinguish top from bottom. The droid unit became my best buddy… he always showed me which way was up.
While many of the pipes are mirrored on either side, some are not. The difference may be small, just a millimeter or so of difference in where it inserts, or how it is shaped, but it is critical to get it right, for every part. Because there are so many, a single mistake early on can be difficult to rectify later.
It took several sessions, totalling about 4 hours, to finish the work outlined in Step 2.
Yes, Step 2.
The next steps were the left and right engines – and then even more pipes. All told, there are around 50 little pieces of pipe. Happily, I only broke one of them, and the mishap was at a point along the pipe that could be easily glued.
But it took quite a bit of work, more than a few paratrooper words, and a few strategic breaks to regain some modicum of sanity.
But finish I did.
On To The Painting
I left off the blue rings on the forward section of each engine, as well as the round front “caps”, as these needed to be painted prior to mounting. This also required that the four long “limbs” protruding aft from each engine, as well as the rear nozzle dealies (tech term alert) be left off.
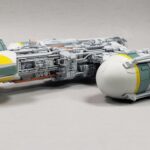
The kit provides yellow decals to adorn the aft end of the white engine caps, but I thought it would look better to paint those. Mixing the same yellow mix I used on the forward section of the model, I sprayed the color on, then masked it off at about the same width as the decals.
I next sprayed the rest of the model with my homebrew of what I labeled “Starship White”, a mix of Tamiya White, Deck Tan, and Sky Gray. It’s not quite white, but not quite gray. With all of that sprayed, I could do the final assembly.
The blue engine rings and white front caps pop right on. The final bit – adding the four “limbs” and the aft nozzle bits, requires approximately 5 hands however.
I found it quite helpful to glue in the little bits that slide into the aft nozzles prior to attempting full assembly. They did not hold well in their snap fit state, and in an initial test fit, they kept dropping out. Once in glued in place, it made assembly much easier. As mentioned with the pipes – pay careful attention to parts orientation if you build this model.
It Builds Character
Standing in the cold on that Saturday morning in 1982, I began hammering away at those pipes. Holding them against the open door of the large trash bin. I pounded away. I found if I did not keep a firm grip on the pipe section, the resulting vibrations from the hammering could be quite painful. Some plaster sections fell off readily, some took quite a bit of work to get done.
The wind howled, and I was very cold. My fingers were numb before too long. Having cleaned off a few, I went back to grab another armful of casts. As I stood there, a realization dawned on me.
All of those plaster casts represented someone’s missing arm, or leg. Maybe both. In fact, my neighbor who owned the business had lost his leg, just below the knee, in the battle popularized in the movie “Hamburger Kill”. Most of his clients were veterans.
I suddenly felt a bit ashamed of worrying about my own lot in life at that moment.
I grabbed a handful of casts, and taking them to the trash bin. started my hammering again. My thoughts turned away from myself, and to the reality that each one of those casts represented. It was a sobering lesson for a cocky 15-year-old.
It took several weeks, but I finally finished that initial pile. I was glad to have persevered, but within a few weeks there were new casts to be cleaned. It was a never-ending reminder for me of those who had paid a high price.
I don’t suppose there’s a great conclusion to tie the two stories together, aside from both involving pipes. And both involved perseverance. Perhaps the patience I learned on those cold days of 1982 contributed to the simple task of building this model. Though it was tedious work, it was the task to be done.
And in light of the reality of what those casts represented, I guess a few hours spent applying tiny parts to a model in the warmth of my home, over 36 years later, really wasn’t much of a sacrifice after all.
After all, it’s really just a hobby. Enjoy it.
Next up for the Whyyyyyy-Wing will be weathering all those pipes and greeblies!

Leave a Reply