I will freely admit, the Maschinen Krieger bug has bitten me.
When I’d first switched over to doing more scifi kits, I’d not felt the draw to build them. Photos posted by other artists looked great, and I appreciated their work. But that feeling modelers so often get – “Hey! I have to build that!” – never really came over me.
Eventually I decided I may as well build one, just to see what all the fuss was about. Though I’d actually ordered this Wave 1/20 SAFS kit first, I opted to start on a later purchase, the New Rally Pawn.
Though I really enjoyed the Pawn kit, finishing it left me with two thoughts.
First, I’d learned a lot about working with the Ma. K aesthetic from that build. It wasn’t that I wanted to necessarily clone everything I’d seen. But I did feel to learn about a genre, to fully appreciate its universe, it would be helpful to stick within canon for a bit.
The second takeaway was a little more fundamental. I’d greatly enjoyed it. Though I had some fits and starts of my own doing, in the end, I had a lot of fun. And that’s the key.
Thus I quickly moved right into construction of the SAFS. (Super Armored Fighting Suit… which differentiates it from the Armored Fighting Suit. Because super, duh… 😉
The kit itself builds up very quickly. Within a short time, I had the full suit built up. In a previous blog entry, I covered getting it to the point of a base coat of paint.
I’d covered over the polycap joints with Milliput, which not only gave a better foundation for painting, but also locked everything in place. While I appreciate being able to articulate the “stompy robot” genres, the traditional modeler in me prefers a fixed pose. It’s easier to paint, and if nothing moves, no paints get scraped off.
Beware Of Sharks
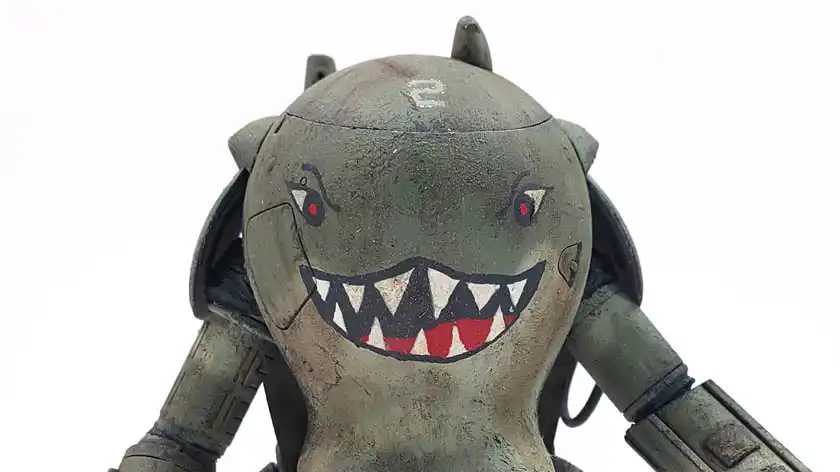
I’d had an idea to add some sort of “artwork” to the model. While the kit came with a few nice looking decals – including a hilarious “walking egg”, I wanted something large, bold, and dramatic. I searched through the stacks of airplane decals I have, but none looked like they’d fit. What I really wanted was an American Volunteer Group (the Flying Tigers) shark’s mouth. I’ve always thought it looked pretty cool, and the shape of the “egg” that is the upper torso of the SAFS seemed to call out for it.
But with no decal, I was hesitant. I’d never painted any custom artwork before. On any kit. Still… my desire to “make it look cool” overrode my fear of messing it up. Grabbing a mecahnical pencil, I lightly drew on the outline of what I wanted.
My first attempt wasn’t very good. It was at that point I happily discovered I could erase the lines easily, without damaging the underlying paint or texture. So I made a few more adjustments. Eventually I arrived at a design I liked.
I opted for simple colors – white, black gray, and dark red, all from various Vallejo paint lines. Starting with the white, I carefully blocked in the teeth and eyes. I made sure the paint was thin enough to flow easily, but I did unload much of it from the brush onto a paper towel. I really wanted as much control as possible from the paint.
It took a few coats, but my #0 liner brush was up to the task, though I’m not sure my shaky hand was. There were a few jagged edges here and there, but I hoped later colors could clean those up.
The white was followed by the red of the “tongue”, again carefully painted with the same brush. I felt a bit more relaxed as I went on, and was fairly happy with the results.
The next step was adding in the black gray color. The hardest part there was getting a reasonably clean edge for the outline of the whole thing. While I wanted the face to definitely look like pilot applied art, I also didn’t want it to look like pilot applied art while dancing in a drunken manner during an earthquake. 🙂
After a few harrowing moments of shallow breathing, the black gray was on.
And while I’m normally reluctant to declare “that looks good” about my own work, I thought “that looks good”. (Although I did give myself the caveat of “for a first attempt… 😉 )
The final step was to add two small red dots in the eyes for pupils.
The final look is a little less menacing than I hoped for, but I suppose it could fall under “maniacally intimidating”. Either way, I thought it looked cool.
And Now… The Weathering
With the artwork in place, I added a few decals. I considered going with the various warning labels and stencils supplied with the kit, but ultimately decided to simply use a subdued number “2” in three locations. I figured as long as I took the time to paint that darn shark face, I wanted it to be the center of attention. 🙂
I’d not given the model a gloss coat for the decals, opting instead for the “Future puddle” method. This is done by placing a small dot of Future where the decal is to be placed. When the decal is applied over it, the Future spreads underneath. Excess is wiped up with a cotton bud. Careful application avoids silvering, but leaves the surface of the model matt – perfect for follow on weathering when a more “grippy” surface is wanted.
Grabbing a few enamel wash products, I applied what I’d describe as a “varied filter wash.” I slopped on a few grimy colors, spreading them around. I wanted a filter-type effect, to draw all the colors together, and to impart a heavy, war-weary look. But I also wanted to start enhancing the panel lines. So I can’t quite call it an application technique. I’d best describe it as “controlled sloppiness.”
When that had enough time to dry, I began chipping the suit. I used the sponge method for the first application, using darker gray acrylic color. As I too often do with my chipping, I went a bit overboard – or so I thought at the time. As later weathering steps were applied, however, the chips seemed to blend in, and the result – to my eye, at least – is actually a bit less chippy than I’d really wanted. It did reinforce a weathering lesson I’ve learned many times. Later weathering steps can hide a lot of early weathering missteps. With some luck… 😉
With the chipping in place, I began a process of adding various streaks, grime, and other insults to the model. I’d started using enamel products, but being concerned with the time it was taking to dry, I dropped back to a new method for me, acrylic weathering.
Working from the “additive” principle, rather the typical “subtractive” for oils and enamels, I started layering up various black, brown, and gray grimy colors. At first, it looked pretty awful. I was becoming concerned I’d made a bad choice. But as I continued to add layers, it started to look more cohesive, and actually began to show what I thought looked like depth.
An Acrylic Lab
When I felt the acrylic washes and stains were sufficient, I grabbed some newly acquired Vallejo Pigments. While I have used pigments quite a bit in the past, I’ve never actually purchased pigments, opting for homemade pastel chalk shavings. As I’ve decided to make more use of them, however, I felt that buying some commercially produced ones was in order.
I began applying them wet, dampening the surface of the model with water, and then adding a “slurry” of powder and water. At first, I thought I’d gone way too heavy. However, as it dried, the effect toned down quite a bit.
As I continued to work, it dawned on me that powders work much like oils. They can be applied easily, and then later reactivated to be worked again. The difference being, of course, that the water dries really fast, and the work/dry/reactivate cycle can be squeezed into minutes, rather than days. Yet they also have the flexibility to be reactivated days later – as long as no varnish coat has been applied to seal them in.
So though I have used powders many times, I’ve never done so to this level, and was quite enjoying the experiments. Eventually, I simply stopped because I needed to get the model finished and photographed!
A few more stains, streaks, dots, and smears were added here and there. A final matt coat was applied. The last step was to add a few glossy streaks around the engine to simulate petrol and oil, freshly spilled. Or leaked. Whatever the imagination dictates.
While I enjoyed the New Rally Pawn, I can say this SAFS model really sold me as a fan of the genre. It was one of those rare builds that I did not want to end. While I’d certainly not hold my completed work as anything special in and of itself, I do think it fits within the Ma. K style – exactly what I was hoping for. More importantly, it helped me learn further lessons on a variety of fronts, including quite a bit about acrylic weathering products.
If you’re already building Maschinen Krieger kits, I don’t have to sell you on them. If you’ve not built one, consider doing so. They’re easily assembled, look pretty cool, and invite great freedom of expression in finish.
And for a great starting point into the genre, I can highly recommend this SAFS kit!


Leave a Reply