For much of my childhood, watching old western and war movies was a common activity on Sunday afternoons. My dad loved them, and always seemed to find something to watch. Whether it was a tale of the Old West, air battles of World War II, or ground combat in Korea, he’d find it. We’d watch it together, and he’d tell me all about the people, places, and equipment.
His favorite was always anything with John Wayne in it. He’d been a fan of “The Duke” from his childhood, and never seemed to tire of his films. It was only by my mom’s insistence that I’m named Jonathan Wayne Bius, rather than John Wayne Bius. So it’s no exaggeration to say he liked the iconic actor’s work.
Like Father, Like Son
Of course, this meant that I liked John Wayne movies too. As the years went by, I learned the titles and characters, and began to memorize the lines. At the time I thought I did a pretty good imitation of The Duke, and assumed everyone’s laughter was just because I was such a darn funny guy. Only later did I realize that the hilarity ensued from how bad my efforts actually were. But I didn’t care… I just enjoyed making folks laugh.
Around 1978 or ’79, dad purchased an amazing machine – a VHS player. Now we didn’t need to wait until Sunday afternoon, hoping to find a John Wayne flick. We could pop one in the player anytime, and away we’d go.
Our collection built up fairly quickly. And while it included a few non-Duke titles, anyone who perused our library quickly saw who our favorite actor was. The western movies took up the majority of the shelf space, which mirrored the actors filmography. However, we had the combat movies too. Sands of Iwo Jima had to be my favorite of the war titles, to the point that I watched it enough to memorize every line. (Though I’ve long forgotten them.)
But a close second – and certainly my favorite aviation movie – was Flying Leathernecks.
Lots Of Blue Airplanes

The movie was a fictionalized account that roughly followed the career of the main character, Major Dan Kirby, played by Wayne. His squadron executive officer, Captain Carl “Grif” Griffin played by Robert Ryan, often butted heads over Kirby’s hard nosed approach to running the outfit. The early part of the movie depicted the exploits of a Marine squadron on Guadalcanal. And though the reality was they flew Wildcats in that campaign, the movie producers relied on the readily available F6F-5 Hellcats. These were flown by pilots from Marine Corps Air Station El Toro.
While I knew enough aviation history at the time to recognize the inaccuracy, I didn’t care. The movie had been filmed in color so that real wartime color footage could be used in addition to the staged flights. That’s what I cared about – the flight scenes.
Those all blue Hellcats zoomed around, climbing and diving and fighting their way through the swarms of Imperial Japanese Zeroes – those being played by Hellcats also, painted white. For a kid who loved seeing airplanes flash through the movie skies, Flying Leathernecks was always a fun afternoon diversion.
Building Eduard’s Hellcat

Eduard first released their 1/48 scale F6F-3 in 2008. While there was quite a bit of noise about cowl shape, most folks acknowledged that it was a very good kit. I built it not long after it was released, and quite enjoyed it. Since that first release, Eduard has re-released it in at least a dozen various boxings, including the F6F-5 version and Fleet Air Arm Hellcat I and II versions. And every type of product edition Eduard produces has had the plastic inside – Weekend Edition, Profipack, and Royal Class. On top of that, they’ve released scores of photoetch and resin parts for it.
I’ve always been a fan of the “Weekend Edition” kits. These kits don’t include any extras – photetch, resin, canopy masks, or multiple decals sets. To keep costs low, the box includes the plastic, black and white instructions, and one set of markings. As I’m not much of a fan of those extra parts anyway, and have enough aftermarket decals to start a small hobby shop, I chose the F6F-3 Weekend Edition kit. I found it for right at $20 too – so it is a real bargain.
The Cockpit
The kit’s cockpit is very good. Not great… but certainly very good. Painted up out of the box gives a very good result. The parts have good cast in detail. However…
One of the beefs I’ve always had with eduard is their instrument panels. In the Profipack kits, pre-printed photoetch is supplied. Making use of it results in a very realistic look. But I’ve always thought it looked a bit odd. Most of the interior is airbrush or brush painted, and thus has a certain “craft” look to it. Using the printed photoetch parts stand out in stark contrast. They do look good… but I’ve always felt they did not “fit”.
Unfortunately, on most of the Eduard kits I’ve built, the part provided for non-photoetch use is very plain. While the shape and general detail is there, the lack of fine, engraved detail really gives it the appearance of being “phoned in”.
And stepping up the game on that part is not impossible. If you’ve ever built some of the later Monogram kits, from the late 70s and early 80s, you’ve seen what amazing detail can be packed into a tiny area. And Eduard’s production capabilities certainly exceed those of such old kits.
Still… it’s not bad by any stretch. “Workmanlike” is a good definition I think.
Getting The Paint On
All the interior parts were given a coat of Mr. Color Interior Green to start with. Various chips were added with a lightened version of that base color, as well as Vallejo Mecha Color Chipping Brown, and a .5mm mechanical pencil. Black consoles were picked out with Vallejo Model Color Black Gray, using a #0 round brush.
Some drybrushing and edge highlighting was added to those areas using Vallejo Model Color Sky Gray. Various details were picked out in other Vallejo Model Color paints, red and white being more prominent.
The kit seat was replaced with a resin example from Ultracast. I like these seats for two reasons – the belts are already cast in, and they are a drop-fit swap. The kit seat looks just fine, but Ultracast’s is better.
The bland detail of the instrument panel was rescued by some instrument face decals from Mike Grant Decals. They look great, and allowed me to “dress up” the IP using my normal methods, but added some realism in the instrument faces.
Everything was given a dark brown wash, and then assembled.
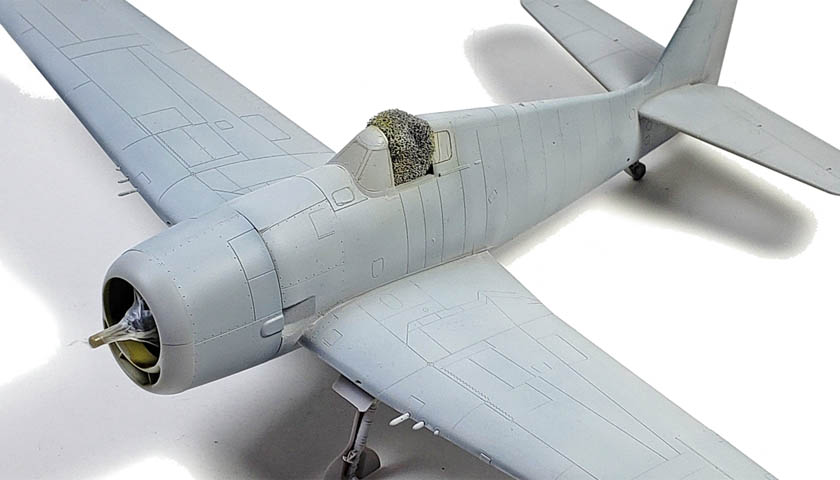
Building The Airframe
Overall, assembly of the airframe is not difficult. The parts fit together very well. A scarcity of alignment pins needs careful positioning is required, but it does not present a major challenge.
Some Mr. Surfacer was used along the fuselage and wing joins. While the fit is very good, it’s not quite tight enough to allow a “welding cement only” fit. To make the process easier, I deepened the panel lines with a razor saw prior to adding the Mr. Surfacer and sanding things down, which helped out quite a bit. Fit of the wings to the fuselage was very good, as the slide into recesses in the sides of the airframe. The tail planes fit in a similar manner, though a little more care must be taken to make sure they are aligned.
The engine was built up, painted, and mounted on the airframe. However, I left the cowling off. It fits well enough to be set in place for painting, but by leaving it removable, the tiny exhaust stubs can be easily painted later in the process.
Gear Assembly Notes

The only part of the assembly that is fiddly is the landing gear. Eduard did a wonderful job of replicating the complex assembly of the real aircraft. But it does make for some tiny pieces. In my previous build of the model, I recalled being a bit frustrated with these steps. So this time I went through quite a few dry fit scenarios, ultimately settling on the order listed below. I won’t claim it is perfect, but it seemed to be the easiest.
Because of the different boxings, the part numbers may not coincide with what is below. If that is the case, you can look at a PDF of the instructions for this kit as a cross reference. Pay attention to which part goes in which side. Also note that many of the parts are numbered for left and right side. While I note the part numbers in these cases, I don’t note which side is which – so pay close attention to the instruction sheet to make sure you’re getting that right. (It does matter!)
This assumes the wings have been assembled fully prior to starting.
- Glue parts G7, G8, and G45 in place. Do not glue in parts G37 and G38 yet.
- Dry fit parts G37 and G38 in their respective sides.
- Next, dry fit the landing gear struts (G4 and G51) in place, double checking for correct placement.
- Dry fit parts G41 and G42 into their sides.
- Glue parts G18 and G20 into place.
- Glue parts G17 and G22 in place. This sets the gear forward angle.
- Using a welding type cement (such as Tamiya Extra Thin), use a brush to apply cement to the parts dry fitted in steps 2-4. If necessary, use tweezers to make sure they are all aligned well and fitted together.
- Glue parts G25/G26 in place. Pay attention to the part orientation shown in the instructions.
- Trim the two small mounting posts on the gear struts that the main gear doors attach to. This allows the gear doors (G14/G20) to have more surface area on the strut for the glue join.
- Glue the small torsion “scissors” in place (parts G47/G9, and G46/G10). Gluing part G9 and G10 into their respective struts first, and allowing them to dry for a minute or so, seemed to help when later setting G46/G47 in place. These parts are really fiddly… take your time.
- Take a break! 🙂
I chose to do all of this before painting. Because the gear is so fiddly, but also quite sturdy, I felt it would be easier to paint and weather in place, rather than trying to add it all onto the model later, after paint was on.
Preparing For Paint
The canopy parts were masked off with Parafilm M. The forward windscreen was mounted in place using Tamiya Extra Thin Cement. A piece of sponge was used to mask off the rest of the cockpit opening. I placed a section of Tamiya tape inside of the sliding portion of the canopy in order to keep it clean.
A few hairline cracks were sealed with Mr. Surfacer. I applied this neatly with a small brush, and then used a cotton bud dampened with alcohol to rub off the excess. A final surface cleaning with a paper towel and some alcohol removed any oils from my hands.
While I normally use Badger Stynylrez Primer, I was out of the gray version. (It only just now occured to me, as I write this, that I could have mixed black and white… ???). I ended up using Tamiya Liquid Surface Primer, the stuff in the square bottle. I thinned it with Mr. Color Leveling Thinner. To be honest, this is one of the few products Tamiya makes that I am not a huge fan of. The primer worked OK, but was quite finicky to get thinned properly. Still, after application, and a little buffing from a soft cloth, it worked fine.
The Reality Hit Home
While I loved watching movies such as Flying Leathernecks as a kid, I realize looking back they set up some unrealistic expectations. When I found myself later in life scrambling around a real combat zone of my own, the youthful romanticism quickly faded away. Things aren’t always so cut and dry, and “hero” takes on a different meaning. Watching war movies has become a thing of the past for most part. I’ve seen the real thing in my own small way. No need to rehash it with Hollywood’s help.
Still, building this Hellcat model has brought memories of simpler days, sitting with my dad, cheering on The Duke. Those Hellcats (and Corsairs later in the movie) were amazing to watch. The drama within the story seemed so real to me. To this day, I think the Hellcat is my favorite of the US Navy fighters from World War II when it comes to model making.
Next up for this Hellcat model with be paint, decals, and weathering!


Leave a Reply