I think it was my 10th birthday that I was given Monogram’s 1/48 TBD-1 Devastator, an early WWII US Navy torpedo plane. I recall being quite excited about it. The box top showed a shiny silver fuselage, bright yellow wings, and several crewman working on the airplane. It looked quite cool.
Opening the box, I was a bit awestruck. Up to that point, the models I’d built had been simpler designs – fuselage halves, wings, pilots with a tab int he back that slotted into the aft part of the cockpit. I’d seen my friend’s older brother build more detailed models, but I’d never actually held one. As I stared into the box, however, I felt as if I’d moved up in the world.
Pulling the sprues out, I ogled the wonderfully sculpted parts. There were seats, floorboards, and detail along the sidewalls. As I looked at the instructions, the realization hit that this kit’s interior had more parts than most of the models I’d built previously had in total.
But I wasn’t scared of it, really. I was actually quite eager to get started. All of those little lumps and bumps would get to be painted.
Like A Kid In A Candy Shop
Thankfully I had all of the colors the instructions listed, so I was able to get right to work. It started with a coat of that horrid silver paint from the little square Testors bottle. I’d discovered that the paint never actually dried, so I’d learned to happily ignore it, and just paint over it. If those silver models were still around, you’d likely be able to get a DNA sample from them they were so fingerprinted.
But I didn’t give a whit about it. There were so many parts to paint, lots of little details to pick out. I didn’t have a brush small enough to paint many of the finer bits, but my mom helpfully suggested using a toothpick, and that opened up a whole new world for me.
My previous builds had always been quick. Slap them together, add a bit of paint on the outside, stick on the decals, and set it on the shelf – ready for the next one. But this Devastator changed my thinking drastically. It made me want to work slowly, carefully, to enjoy the process. I suppose it was this model that opened my eyes to the joy of the journey, rather than a focus on the destination.
What I Really Liked
The discovery I made was that I enjoyed painting interior detail. To be honest, that Devastator in many ways ruined my modeling preferences. No longer would I get those overly-simplified basic kits. I wanted detail. Actually, a better word would be I craved detail. Pilots with tabs in their backs, and a hollow cockpit, would not suffice.
Other models followed, such as the wonderful Monogram bombers. The B-17, B-24, -25, 26, and massive B-29 all eventually crossed my workbench over the next few years. While each of them was cool in their own right to me, the primary focus was painting that interior detail.
Ch-Ch-Ch-Changes
I’ll have to admit that the design of the Maschinen Krieger Falke has not always been very appealing to me. When I first saw it a few years ago, I found it downright odd, maybe even a bit grotesque. Even with a quick three minute backstory brief from a friend, I just looked at it, head tilted, and thought “but why?”
Its shape is a bit jarring if you’re background is in the relatively sleek world of fighter planes. Whatever graceful curves it possesses are broken up by abrupt contours, odd appendages, and an overall shape that seems to defy the basic principles of aerodynamics.
Yet as I began building various Maschinen Krieger armored suits, I began looking more and more at it. In an odd way, I began to see it differently.
Much as the Devastator has changed my perception of modeling with regards to detail, Ma. K had the same type of effect in terms of scale. Virtually everything I’ve previously built was in 1/48 or smaller. There were a few forays into 1/32, and even a couple of Airfix 1/24 Spitfires – somewhat of a challenge to build. Maybe it’s my eye not being what they were, or my hand not being as steady, but painting and weathering in 1/20th scale had a great appeal.
A Kid’s Anticipation

When Hasegawa announced the release of a reboxing of the Falke – the Model I Otsu – I figured it was as good a time as any to take the plunge. I’d read that it was essentially the same kit that had been released several times previously, only with new decals. As I’d never built one though, I figured it didn’t matter. I may as well start with this “new” release. While it may not be new to the world, it was new to me!
While I’ve been excited to get started on various kits over the last few years, waiting for this one to be released, and then cross the ocean, really worked to heighten my anticipation.
And when it id arrive, I was not disappointed. The sprues were very nicely cast, and typical of the previous Hasegawa efforts I’d built. As I’d hoped, the large size made the details really stand out. Examining the cockpit showed it was a bit sparse on detail. I did take a pause to consider some scratch built additions. However, in the end, I realized the detail and scale were sufficient to go mostly out of the box. (Except for a couple of bits… see if you can spot them. 😉 )
A Falke’s Office
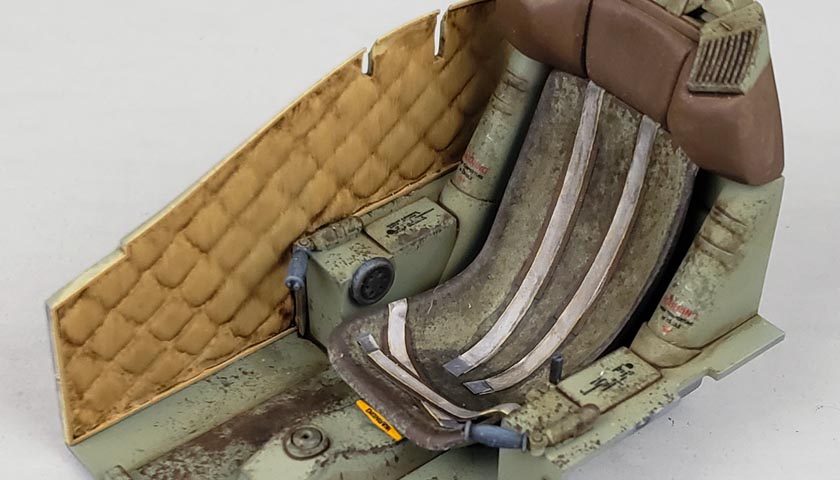
The parts are basic enough. A seat, instrument panel, cockpit floor/backwall, two sidewalls, and a few small detail bits make up the interior. A test fit showed that when in place in the somewhat cramped fuselage interior space, the scarcity in some ways worked. It seemed to be “all the sort”, and visually made sense.
Giving a nod to Ma. K history, I opted to start with an “old school” color, Mr. Color RLM02. As this is a proper lacquer paint, I knew it would adhere quite well, and could serve as both primer and base coat. The two sidewalls, which appeared to be some sort of noise absorbing material, were given a coat of Tamiya’s Deck Tan, thinned with Mr. Color Leveling Thinner to make sure it adhered well to the bare plastic.
Chips And Bits
I wanted the interior to have a really worn look, and thus started with a sponged application of Vallejo Mecha Color Chiping Brown. I like this color for a few reasons. First, it looks good as a chipping color. It sells the idea that paint has come off. A secondary purpose though is it imparts a sort of “dual use” in the story telling. To some people’s eye, it may represent underlying metal, or primer, or some sort of space composite. To others, it may suggest a slightly rusted or oxidized look. The ability for it to allow the viewer’s mind to “write” the story is nice. While my mind has a certain interpretation when I view it, I’m quite happy for someone else to see it from a different angle.
With chipping in place, I began to paint the various internal bits. The padding on the aft wall of the cockpit, and in the roof hatch, were painted Vallejo Leather Brown. All other detail was given a coat of Vallejo Black Gray. this was done to establish a “shadow” around the lower edges of the parts. As most of the detail was cast in, creating a bit of a shadow where the detail raised up would work nicely when later washes were applied.
With the black color in place, more color was painted over the top, with tubing being picked out in several colors, and a few areas drybrushed with Vallejo Sky Gray. The kit decals were used in the instrument panel dials, and a few other stencils were sourced from previous Ma. K builds and scattered about the interior. If you ever build a somewhat plain interior -add a few stencil decals. It’s amazing how it “dresses up” things, with very little actual effort.
Please Be Seated
I thought the seat looked a bit bare without seatbelts. Initially searching for some photoetch options, I wasn’t happy with the products available. Most that were in scale seemed to be designed for modern F1 cars, and looked way beyond what I was wanting. I just wanted simple belts and buckles.
I decided to use an “old school” aircraft fallback – Tamiya tape. The belts and pads were cut from painted Tamiya tape, stuck on the seat, and adorned with small bits of lead foil to represent buckles. While not the most visually striking solution, they’ll do for me.
Final Steps
Everything was given a fairly heavy wash of Raw Umber artist oils thinned with odorless thinner. I didn’t try to be particularly neat in application, as I wanted to give it a look of a well worn piece of equipment that had spent more time in use for its actual purpose than simply sitting in a hangar being maintained.
The oils were blended, cleaned, and smeared, first with a dry brush. Any areas I felt were still too stark were then blended with a brush lightly damp with thinner. A mechanical pencil was drawn along various edges, and polished with a cotton bud, to represent bare shiny metal. All was then given a coat of Vallejo Mecha Color Matte Varnish. A few bits were glued into the upper fuselage half, and the cockpit “tub” itself was glued into the lower fuselage half.
Test fitting showed it fit just right. The detail that was visible through the hatch opening looked convincing enough to my eye, and I felt it sold the concept reasonably well enough.
An Inside Job
I think there’s part of me that could just build interiors, nothing else. While I do love painting and weathering exteriors, I tend to judge my own work by how the inside looks. If that goes well, the rest of the model generally flows from it. Have trouble in that inside area, though, and it seems to set the tone for me the rest of the way.
When 10-year-old Jon finished the cockpit of that Devastator, I shared it with my friends as though it were a model all of its own. I actually waited a few days to tuck it inside the fuselage. It just looked so cool, I felt bad tucking it away. And I also knew I wanted more – more detail interior to paint.
In many ways, Ma. K has been a similar watershed moment for me. The very scale of the genre has opened up new “brain pathways” that are really fun. Even with the minimalist detail on this Falke interior, it works. The size of what is there creates a presence that holds its own.
I’ll continue on with it, getting the fuselage close dup and sanded, everything primed, and then getting the paint on.
But before I do that, the fuselage halves will remain apart. A part of me that is still 10 years old wants to look at it for a bit.


Leave a Reply