I wasn’t too happy about the prospect of dinner… which was unusual. Normally I was the first one lined up to fill my plate, rarely with regard to others. I was a hungry kid, and food was meant to get in my belly. Simple enough.
But today, I wasn’t too sure about it. As I stood next to the stove, with a large pot of water boiling on it, I had a chance to think about my dinner a bit. In fact, I pondered if it was thinking about me too.
This was my first encounter with lobster. We’d gone to the house of a business associates of my dads. They were nice enough, I suppose, but I didn’t like them. Something seemed weird about them. They laughed a lot… that kind of laugh that gets a bit of an extended drag out at the end, and then merges into some phrase.
“Hahahahahahahaaaaaaaa…. isn’t that precious?”
That kind of thing.
Mom and Dad seemed to like them. But I wasn’t so sure.
Face To Face
My Dad and The Man called me into the kitchen with them. The Man seemed overly concerned about me watching the lobsters go into the boiling water. He thought it would “be loads of fun”. Hahahahahaha…. I was a bit terrified at the prospect – but I did not want to show him. As he reached into the cooler, full of live lobsters, he’d hold one up, declaring “what a beauty”, and then into the water it would go.
I was sure I heard a tiny scream. But resolute I remained. Cool. Aloof. He would not get the pleasure of seeing me flinch.
Eventually, he picked one up, and set it on the counter in front of me. “That one will be yours. What do you think?” The Man gave me this goofy grin…
Years later I’d swear that Chevy Chase’s character in the movie Vacation was based on The Man. Looking at the lobster, and back to the Griswold clone, I just shrugged. The Man seemed to find even this funny… offering up that slightly maniacal laugh, trailing off with “how cute.”
He finally reached over, and grabbed my lobster. He briefly held him over the water, and with a goofy grin, said “say bye to Mr. Lobster.”
Building The Crustacean
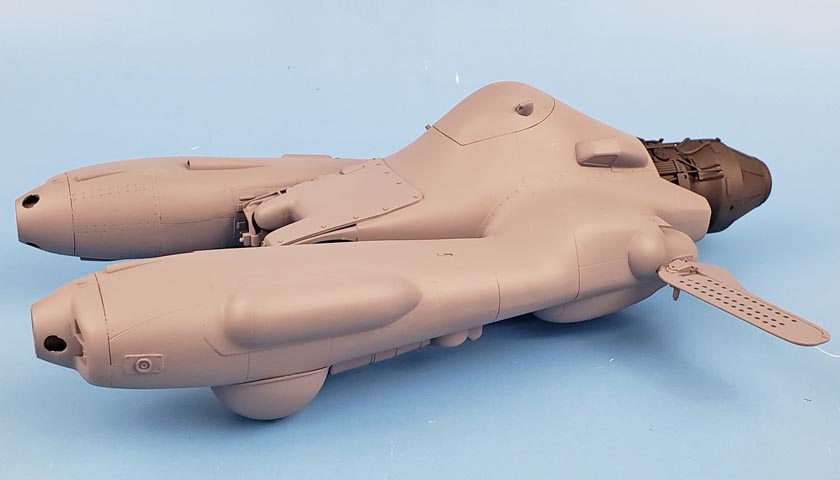
I’d heard quite a few reports that getting the Falke’s upper and lower fuselage halves aligned would be a bit troublesome. Given that it’s a Hasegawa kit, that didn’t surprise me.
Hasegawa loves to make use of inserts in their models. Well… at least their aircraft models, which is what I’ve built. And while their kits fit together well enough in general, they don’t always fit precisely. Very often, the inserts are off just enough to cause headaches in getting everything lined up and smoothed out nicely.
So it was with this in mind that I started looking at a build “strategy”. Key to this process is test fitting, over and over.
I started by simply dry fitting it all together. The engine slotted between the upper lower airframe halves. While it fit just fine, this would make for some pretty hefty masking to cover it up. There were two inserts that went in the inner side of each air intake “boom”. Fit of these was not perfect. Not bad, but it certainly could be better.
I went on through the parts, here and there taping them on to hold them in place. Once finished, I examined everything.
The Mk. I Eyeball
This stage is the key to determining the whole build strategy. It sounds a bit simplistic, but I looked at everything. Every join, every crack, every gap was examined. In a few places I used a marker to “remind” myself to examine that section further. While it sounds very basic, I’ve been surprised how few modelers I talk to really spend much time at this stage. Yet I think this is a very critical milestone that can’t be overlooked.
At this point of a build, anything that is not fitting well won’t fit well later on, left as is. No amount of hoping it gets better will work. I know this, because I’ve been bitten by it more than a few times. “Primer will take care of it.” “Weathering can cover it up.” “I can always address it later.” In some cases, those statements may be true. But for the most part, the more work done before gluing it all together means there will be less work needed later.
So I got to work.
Sand Early, Sand Often
I started by holding parts together and lightly sanding them… before ever using glue. Many parts have a slight lip, a minor step, or a mismatch. Working to get all of this lined up before gluing essentially gets the parts in the shape the manufacturer intended them to be. No model company sets out to produce ill-fitting kits. (Though a few make me wonder, now that I think about it. 🙂 ) The intent is for a kit to fit well. But manufacturing processes, repeated use of the tooling, and a host of other factors means that most kits have something not quite up to par.
Thus, sanding before gluing trues the parts up. In extreme cases it may mean major trimming, or some putty or plastic additions. Getting things to fit right, while a bit time consuming, helps pay off in the long run.
Going around the Falke’s airframe, there really weren’t too many places to sand, thankfully. I used a metal file to even up the mating surfaces, setting it on boths of the hulls edge to get a nice, smooth surface. Some 400 grit sanding stick action removed a few lips and burrs here and there. The flying lobster was headed in the right direction.
Inserts And Doo-Dads
Test fitting the inserts that went on the inner side of each boom showed they would not fit perfectly as-is. Because the majority of viewing takes place from the top of the model, I fitted the parts into the upper hull. They fit tight enough that I could get them aligned, and then test fit into the lower hull. This showed that when a good fit was achieved in the upper hull, a slight bit of overhang resulted along the bottom edge of the part where it joined the lower hull.
More sanding and testing followed, until I got it to a point that further shaping would have degraded the fit. At times, the best that can be reached as “as good as it will get” stage. Going past this will mean having to add back plastic… a much more difficult process.
Don’t Forget The Engine
A final issue was the engine. Tabs on either side of it slotted between the upper and lower hull halves, getting it aligned just right. However, this meant it would need to be painted and masked, which was a bit of a pain in my mind.
Looking at the design, I figured the simplest way to deal with it was to snip off the mounting tabs, and then slip it into place afterwards. Taking a deep breath and some old nippers, I cut the tabs off. A quick test fit showed that it would not slide in easily. It could be finagled in… but that might scratch paint.
Using a heavy sanding stick, I started sanding down edges that I could see prevented a direct “slip in”. I made sure to not sand then flat, but rather to retain curves and shapes. My goal was not just to sand stuff away, but rather to reduce the size of the existing detail, features, and shape.
After a few minutes work, I had it set so the engine could be fitted in from above at a slight angle, then rotated in place. The back of the engine rested flush against the inner wall of the airframe, insuring proper alignment.
A few other parts were test fitted, sanded, re-fitted, and finally given approval. Now it could all be glued together.
Making It All Stick
While most of the glue work I do is with Tamiya Extra Thin Cement, sometimes on larger mating surfaces, I like to use the Testor glue in the black square bottle with the needle applicator tip. The glue holds OK, but the key to it is that it doesn’t dry up as fast as Tamiya Extra Thin.
On areas that were more difficult to reach, I applied a thin bead of the Testors glue, and began pressing things together. The inner boom inserts were glued in place first, and given some time to dry. Any parts that were to be placed near the major upper and lower hull joins were set aside until those areas could be addressed.
The big join – between the upper and lower hull pieces, went very well. The work done ahead of time paid off. I glued it in small sections, using Tamiya Extra Thin. The sections were squeezed together, which extruded a slight glue bead. I worked my way around the hull, until it was all joined.
Elbow Grease Time
Even with all the pre-work to get a good join, a seam is a seam is a seam. Some sanding was needed. Starting pretty heavy, using a 180 grit sanding stick, I wet it with water before working sections. Periodically, I’d test the sanding along the way by dragging my fingernail across it. Any imperfection will register immediately as resistance.
Once the heavier stick had seen all the seams, I went to the 240, then 300, and finally 400. Using a yellow highlighter marker, I traced a line along all the joins I’d sanding. Using an 800 grit sanding stick, I then polished off the yellow ink. Once finished, anywhere I saw a tint of yellow indicated an area that needed more attention.
This process was repeated until all the seams were smooth.
Adding In The Other Bits
With that process behind me, the remaining surface parts that I wanted to have on prior to painting were glued in place. Any cracks were filled with Mr. Surfacer 500, and then it was smoothed over with a cotton bud dipped in alcohol. This created a seam line with a shallow depth, rather than a deeper crack.
I also used a razor saw to restore any panel lines that had been made too shallow, or even obliterated. Four small raised rectangular areas on the fore and aft boom sections had been sanded smooth, and these were recreated with plastic card.
With all of that finished, everything was primed in Badger’s Stynylrez primer. Gray was used for the airframe and ancillary parts, and black for the engine unit.
Not Much Of A Dinner
When dinner was finally served, I wasn’t too hungry. For one, I was a little sick about the lobster’s execution. Not that I wasn’t going to eat him. I just thought it could have been a bit more dignified. I think my hunger was also a bit on the low side because there had been mounds of those little smoked sausages wrapped in crescent roll dough, and I’d feasted on those. All of them, pretty much.
As we began to eat, I found another problem with eating lobster. They make you work for it. The whole meal was a series of crunches and cracks and pops, as everyone dug into the lobster’s exoskeleton to get at the meat inside. Only my dad was spared. He had a horrible shellfish allergy, and he’d “settled” for a steak.
Once the evening was over, and everyone said their goodbyes, I was quite happy to leave The House of The Man. I can still picture him now… goofy grin, waving at me, and then came the inevitable wink. Then he pointed at me and said “see ya later, sport.” I’d had enough. I rolled my eyes and climbed into the car.
Building A Flying Lobster
The first time I saw a Falke model, I thought of that darn lobster. Maybe it was that memory, or perhaps just its odd shape,, but it didn’t really resonate with me.
Yet as I’ve begun to explore Maschinen Krieger, the look of the Falke has grown on me, to the point that I quite like it. The assembly of the kit has only reinforced that. It’s not difficult at all, and with a little planning and fitting, goes together quite nicely. Unlike that lobster eating experience, I am enjoying this one. Quite a bit in fact – I’m already planning a future build of another Falke.
Griswold Epilogue
As we drove home, Mom and Dad were uncharacteristically quiet. I began to get a bit self conscious. Maybe they’d seen me roll my eyes? Or perhaps my dislike of The Man had risen to a point that I’d embarrassed them. As I replayed the evening through my mind, my worries were suddenly interrupted.
Mom laughed. She looked at Dad, who also began laughing. Together they continued to laugh, talking in hysterical half sentences about the evening. I was confused… happy… but confused. I finally asked… “what’s so funny?”
My mom got a bit more serious, and turned around to look at me sitting in the back seat. “Sweetie, we had a very nice evening. Mama and Daddy just thought those folks were a bit… well, we didn’t see too many things eye to eye. But we did have a nice time, and they were very nice to provide such a fancy meal.”
Now I was really clueless. “So are we going back?”
Dad got this look… a serious look that I knew was done in humor. Mustering up his best Foghorn Leghorn voice, he said “Son…, I say son… not if ya paid me!” Mom snorted loudly, and began laughing again. He grinned at me in the rearview mirror.
I still didn’t understand it. But I was quite happy about the result. No more visits with The Man.
As for the Falke – on to the painting and weathering!


Leave a Reply